Getting Started
HPE Morpheus VM Essentials Software is a virtualization solution allowing for easy deployment of KVM-based HVM clusters with administration made easy through VM Essentials manager. Once deployed, take advantage of powerful features including live migration of VMs across cluster hosts with zero downtime, dynamically distribute workloads based on load, automatic failover of workloads following the loss of a host, and a lot more. Provisioning new workloads is also made easy with the VM Essentials image library, automation tools, and powerful provisioning wizard. In addition to HVM clusters, VM Essentials also includes a deep integration into VMware vCenter, which also takes advantage of the same powerful provisioning wizard, automation engine, and monitoring capabilities.
This documentation covers the system requirements for HVM clusters and a setup guide for installing VM Essentials manager. It also includes example use cases for effective implementation of the feature set and in-depth sections for each area of the UI detailing the capabilities of each tool.
Before getting started, it’s important to note that administrators have the responsibility to install and configure servers and network equipment in a way that will ensure successful operation of VM Essentials. This includes selecting host servers, storage hardware, and networking hardware that have been certified as compatible with the platform. The VM Essentials section of the HPE Support Center contains a reference architecture document which includes a validated design with specific hardware SKUs. The same section of the HPE Support Center also includes a qualification matrix which lists hardware that has been certified compatible.
Additionally, administrators will be required to perform some setup functions on their own, such as preinstalling Ubuntu 24.04 (or 22.04 though you won’t be able to utilize the latest cluster layouts) on host servers, configuring networking for each host, configuring access to external storage at the OS level, and establishing a network topology that ensures acceptable performance. Subsequent sections of this document will outline some effective network designs and some tips for selecting a network design based on available hardware. It will be the responsibility of the administrator to select a network design based on available hardware and to use the Linux command line to establish appropriate network bonds, storage configuration, and access across the cluster.
Network Considerations
In order to run VM Essentials effectively in production, network redundancy and throughput must be considered. Network bonding is an important component to building redundancy into the environment so we will briefly discuss it here before showing some example network configurations. Ultimately the environment is your own but this discussion and the example network configurations that follow will help in planning out an effective operating environment for VM Essentials.
Network Bonding
Network bonding is the combining of multiple network adapters into a single logical interface. This is done to build in redundancy and to increase throughput. Network bonds are configured at the operating system level and there are multiple types of network bonds depending on hardware support and other factors. Here we will call out two types of network bonds that are effective for virtualization and utilized in the example configurations that follow. Once established, we can later offer up these bonded interfaces as a compute network (for virtual machine traffic) or storage network (for interacting with external storage) when creating our cluster within the VM Essentials manager UI.
Link Aggregation Control Protocol (LACP) 802.3ad
LACP offers dynamic link aggregation with automatic negotiation, meaning the host and switch can communicate to determine the best available transmission parameters. It also includes load balancing and failover capabilities in the event of a failure somewhere in the path (failed interface, switch, etc). Bear in mind that LACP bonds require hardware support from a compatible switch but most current enterprise-grade switches do support it. If you have supported hardware and high availability and dynamic load balancing are important for your workloads, this is a good choice of bond type.
Balanced XOR
Balanced XOR is another bond type worth considering, especially if your switch hardware does not support LACP. It’s simpler to set up and provides basic load balancing and failure but is less fexible and dynamic as compared to LACP. It’s a good choice in environments where LACP is not supported or where dynamic load balancing is not required.
Example Network Configurations
If you have the capability to do so, it’s recommended you set up networking with full redundancy. Such a setup could include two network switches and hosts with at least six network interfaces spread across two network cards. This would allow for failover in the event of the loss of a switch and/or one of the host network cards in addition to separating management and compute network traffic to their own interfaces. Hosts with only four NICs each can still be configured for full redundancy but would have to converge management and compute traffic across the same interfaces. Keep in mind also that these examples use MPIO (multi-path input/output) for storage. It would also be possible to use bonding for storage depending on capabilities of the environment. MPIO is recommended whenever fibre channel or iSCSI LUNs are being used for GFS2 datastores.
Six NICs with LACP bonds and MPIO for storage traffic
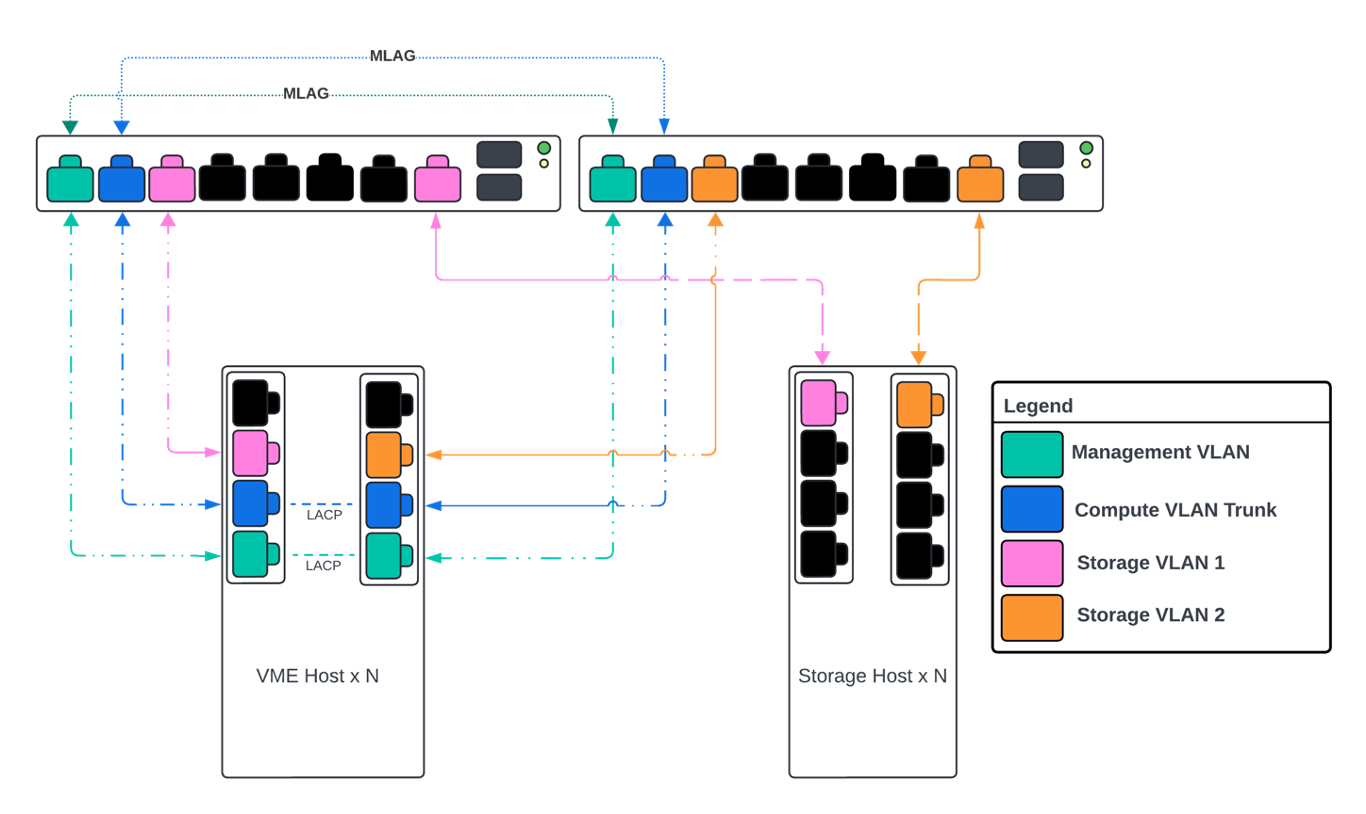
Six network interfaces
One VLAN for management
N VLANs for compute
Two VLANs for storage
Management and compute interfaces bonded on the hosts
MLAG bonding on switches for management and compute
In the diagram note that each host has two network cards with four network interfaces on each card. We have a management network where the host IP address will go, which is an LACP-based bond that is replicated on the switches in a multi-chassis link aggregation group (MLAG). We also have a compute VLAN trunk to create networks for provisioning workloads onto. This is a similar bond interface with LACP and MLAG. For storage, it’s recommended you use either fibre channel or iSCSI connectivity. To support that, in this example, two separate networks are created so MPIO can be configured (Multi-path Input/Output). MPIO provides multiple physical paths between hosts and storage devices which, like other considerations here, offers increased throughput and resiliency.
Six NICs with XOR bonds and MPIO for storage traffic
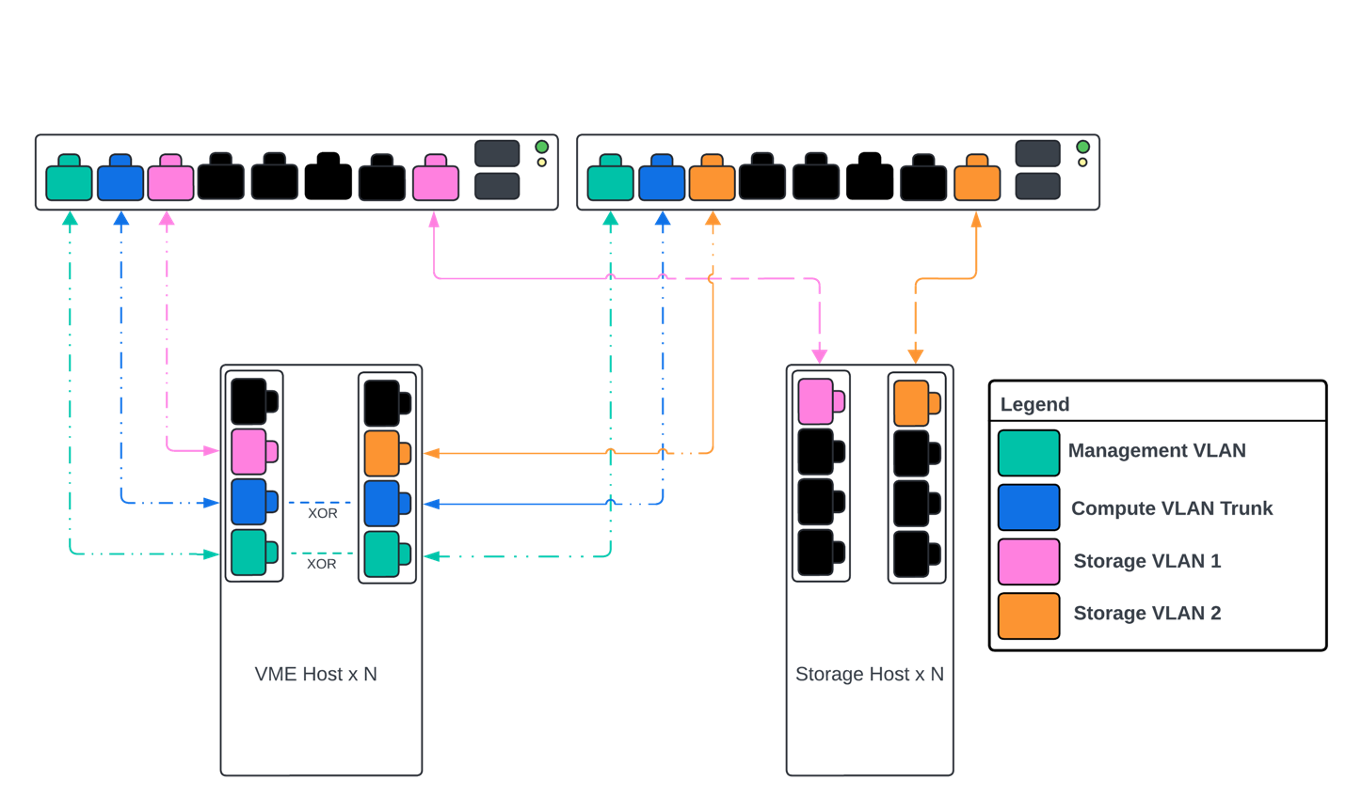
Six network interfaces
One VLAN for management
N VLANs for compute
Two VLANs for storage
Management and compute interfaces bonded on the hosts
MLAG bonding on switches for management and compute
This configuration is very similar to the previous one but the MLAGs have been removed from the switches and changed the bonding type to XOR. As mentioned previously, this model might be a good selection for environments with switches that don’t support LACP bonds.
Four NICs with LACP bonds and MPIO for storage traffic
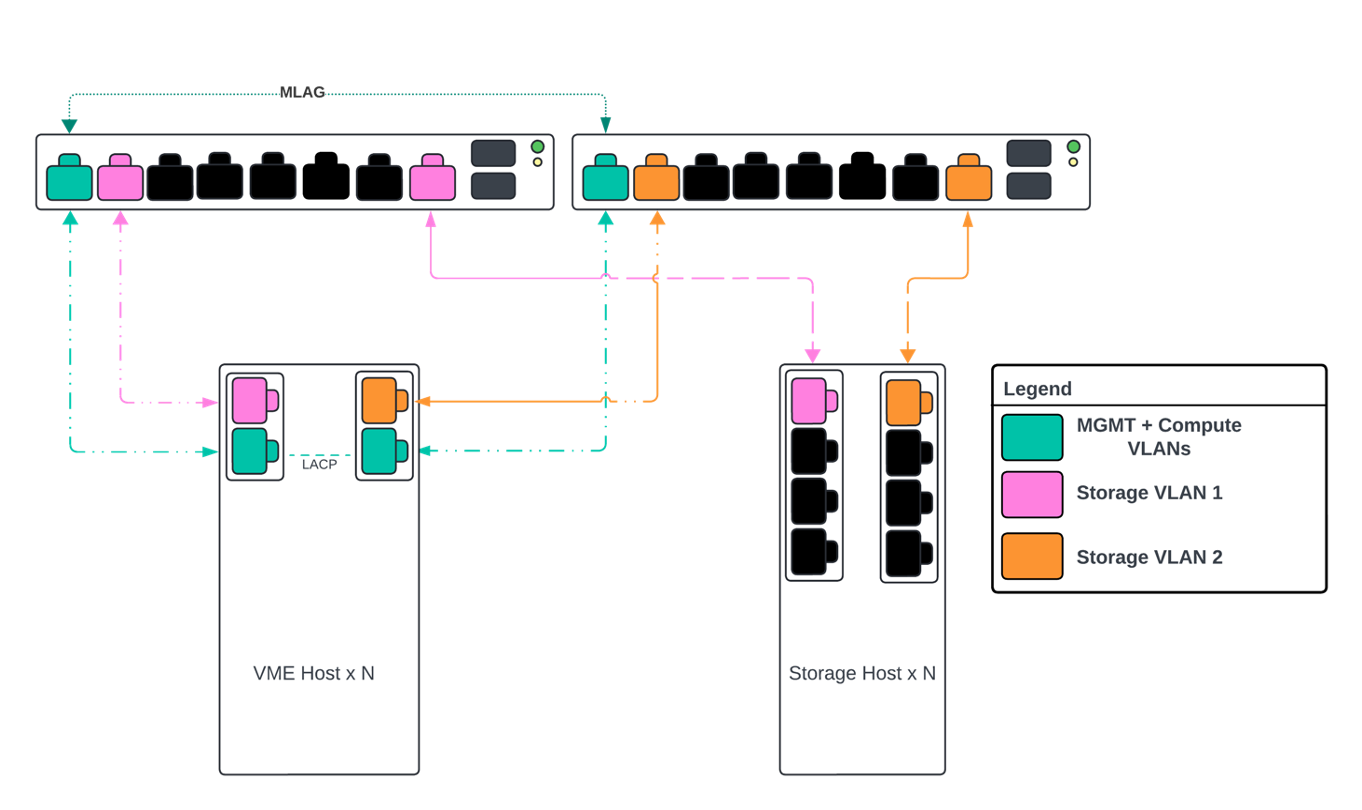
Four network interfaces
Management and compute VLANs on the same network trunk
Two VLANs for storage
Management interfaces bonded on hosts
Compute interfaces bonded on hosts
MLAG bonding on switches for management and compute
If there aren’t enough interfaces available to separate the management and compute networks, a network configuration similar to the one shown here might be a good option. In this configuration, since there are only four network interfaces per host, the management and compute are converged. Once again, we have an LACP bond on this converged interface with MLAG on switches. We also have separate networks to handle storage MPIO.
Four NICs with XOR bonds and MPIO for storage traffic
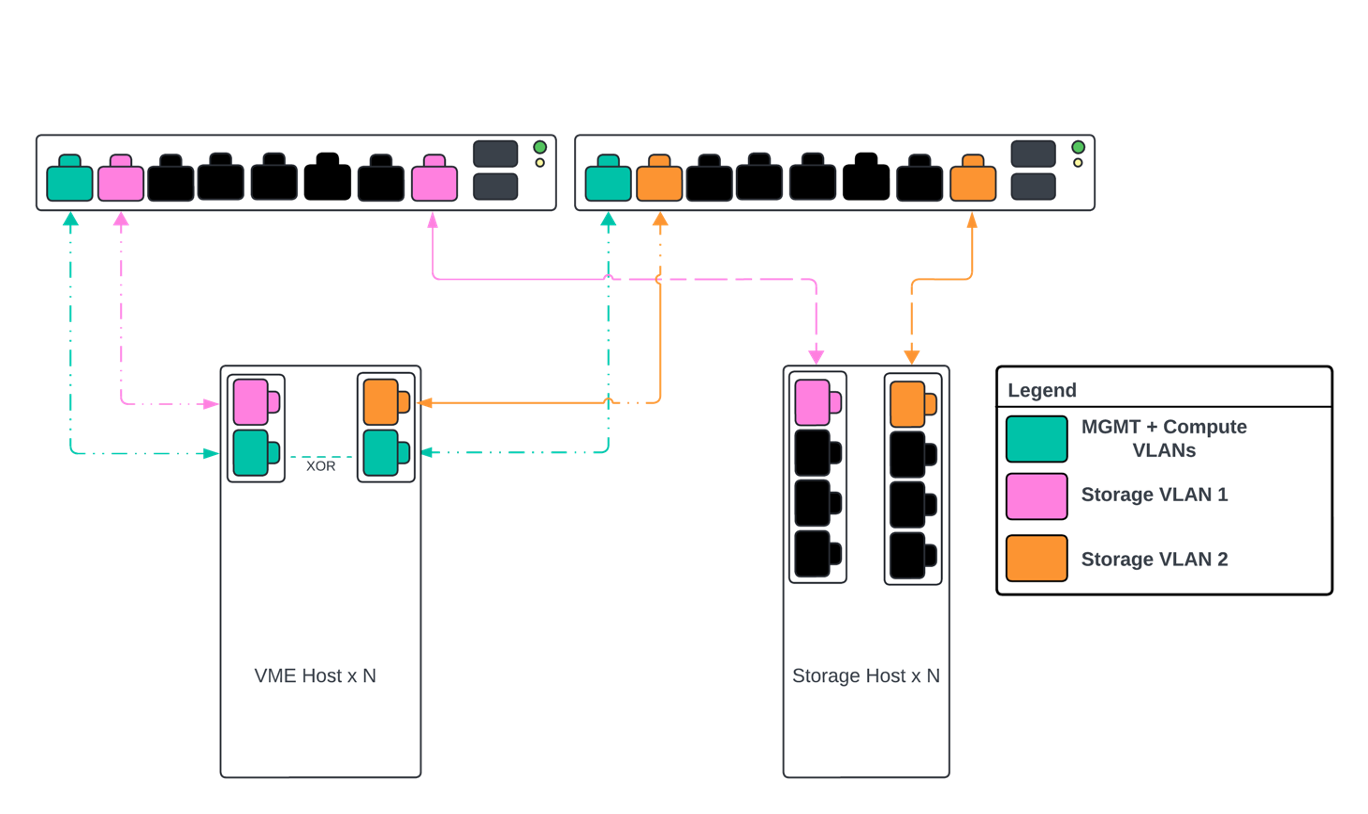
Four network interfaces
Management and compute VLANs on the same network trunk
Two VLANs for storage
Management interfaces bonded on hosts
Compute interfaces bonded on hosts
MLAG bonding on switches for management and compute
This network example is very similar to the previous one with LACP bonds replaced with XOR bonds and MLAG removed. All configuration is handled at the host level. Other configurations are unchanged.
Installation
Having completed a discussion of networking considerations in the previous section, let’s now turn to OS installation on the HVM hosts. The hosts are recommended to be HPE Proliant physical servers (see the compatibility matrix for a list of recommended compute server choices) and must be running Ubuntu 24.04 to utilize the latest cluster layout (HVM hosts running Ubuntu 22.04 may also be used but are only compatible with HVM cluster layout version 1.1). The HVM hypervisor runs on top of the Ubuntu hosts. We’ll get to the installation portion in the next section but for now we will discuss the system requirements and recommendations for network and storage configuration during the installation.
Host Requirements
Operating System: Ubuntu 24.04 to utilize the latest HVM cluster layout
Hardware: HPE Proliant hardware is recommended with additional hardware being tested and certified over time (see the compatibility matrix for a list of recommended compute server choices)
CPU: One or more 64-bit x86 CPUs, 1.5 GHz minimum with Intel VT or AMD-V enabled
Memory: Minimum of 8GB for non-hyperconverged (HCI) deployments or 8GB plus 4GB for each data disk for HCI deployments
Storage: Minimum of 50GB for operating system storage
Network: 100 Mbps or faster NIC (10 Gbps recommended)
IP Addressing: Static IP address
Internet Connectivity: Internet access is required to download and install the required packages and dependencies
Ubuntu Network Setup
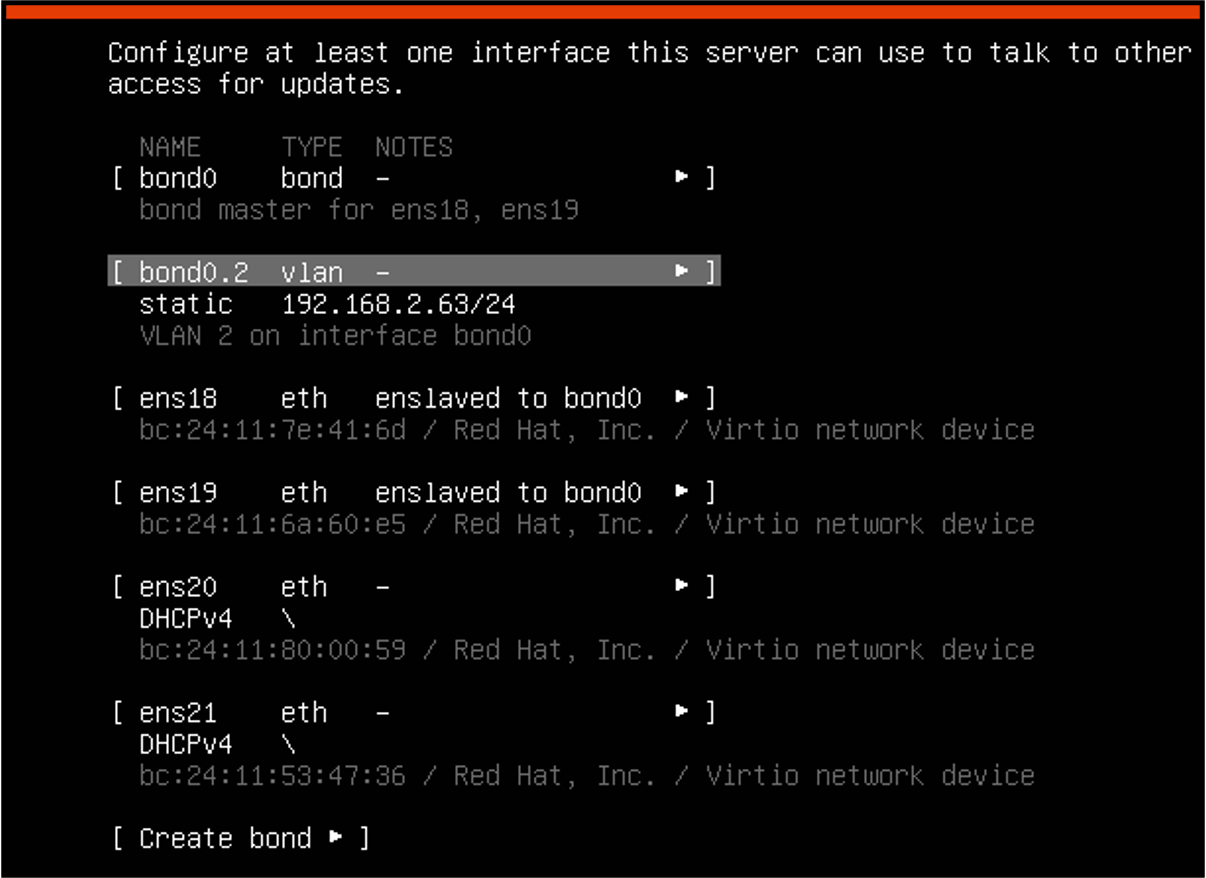
During the networking setup portion of the Ubuntu installation, with some network configurations you might have to create the initial bond for the management network in order to get initial connectivity. Bonds can be created from the Ubuntu deployment wizard itself and a discussion of different bond types and their potential usefulness within an effective VM Essentials networking scheme is described in greater detail in the previous section. In the screenshot below, the host is using a converged management and compute interface bond. The bond was created and a VLAN added to the bond. After creating the VLAN, an IP address was assigned at which the individual host can be managed. Thus, when setting up the cluster later, we can identify the bond0.2 interface for host management traffic and bond0 as the interface to send all compute traffic. Of course, this is a specific caveat that may not apply such as if you’re not using converged networking (described in the previous section) or if DHCP is configured.
Ubuntu Storage Setup
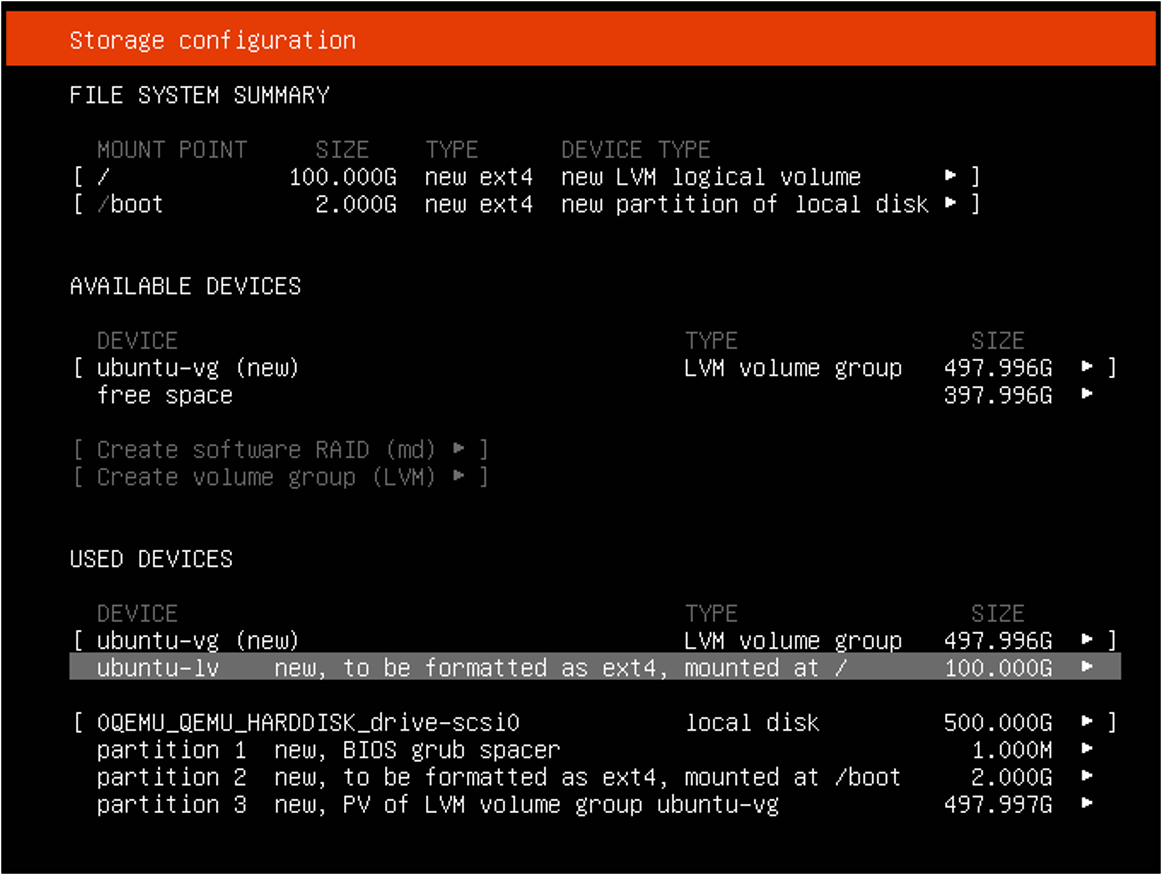
During the storage setup portion of the Ubuntu installation, keep in mind that Ubuntu won’t utilize the entire disk by default when using LVM. You’ll need to grow the disk. This guide won’t discuss that process in complete detail but there are plenty of guides available on the Internet if they are needed.
External Storage Setup
Though it is possible to utilize local storage on the hosts, more commonly HVM clusters will be configured to interface with external storage. Currently, connecting to external storage over iSCSI and Fibre Channel is supported, see the compatibility matrix for a current list of vetted hardware and protocols. External storage provides a number of redundancy capabilities that aren’t realized through local storage, such as automatic failover when a host is lost and migrating workloads to new hosts with zero downtime.
Configuring connections to external storage must be done on each host at the OS level. This is part of preparing the hosts for installation of the VM Essentials console and manager. This is done by going to the Ubuntu command line on each host and configuring the initiator to talk to the target. Once this is done and the disk is presented up to the OS, the groundwork is laid for configuring the datastore within VM Essentials manager. This process of creating a new datastore within the Manager UI is shown later in this guide following installation.
How the storage traffic is routed will depend on networking configuration. Having dedicated storage interfaces, as shown in the network examples from the previous section, is important for optimal throughput and resiliency. After establishing the datastore in the VM Essentials manager UI, this will ensure the operating system is utilizing those dedicated routes rather than through other interfaces that might be available.
Console Installation and Configuration
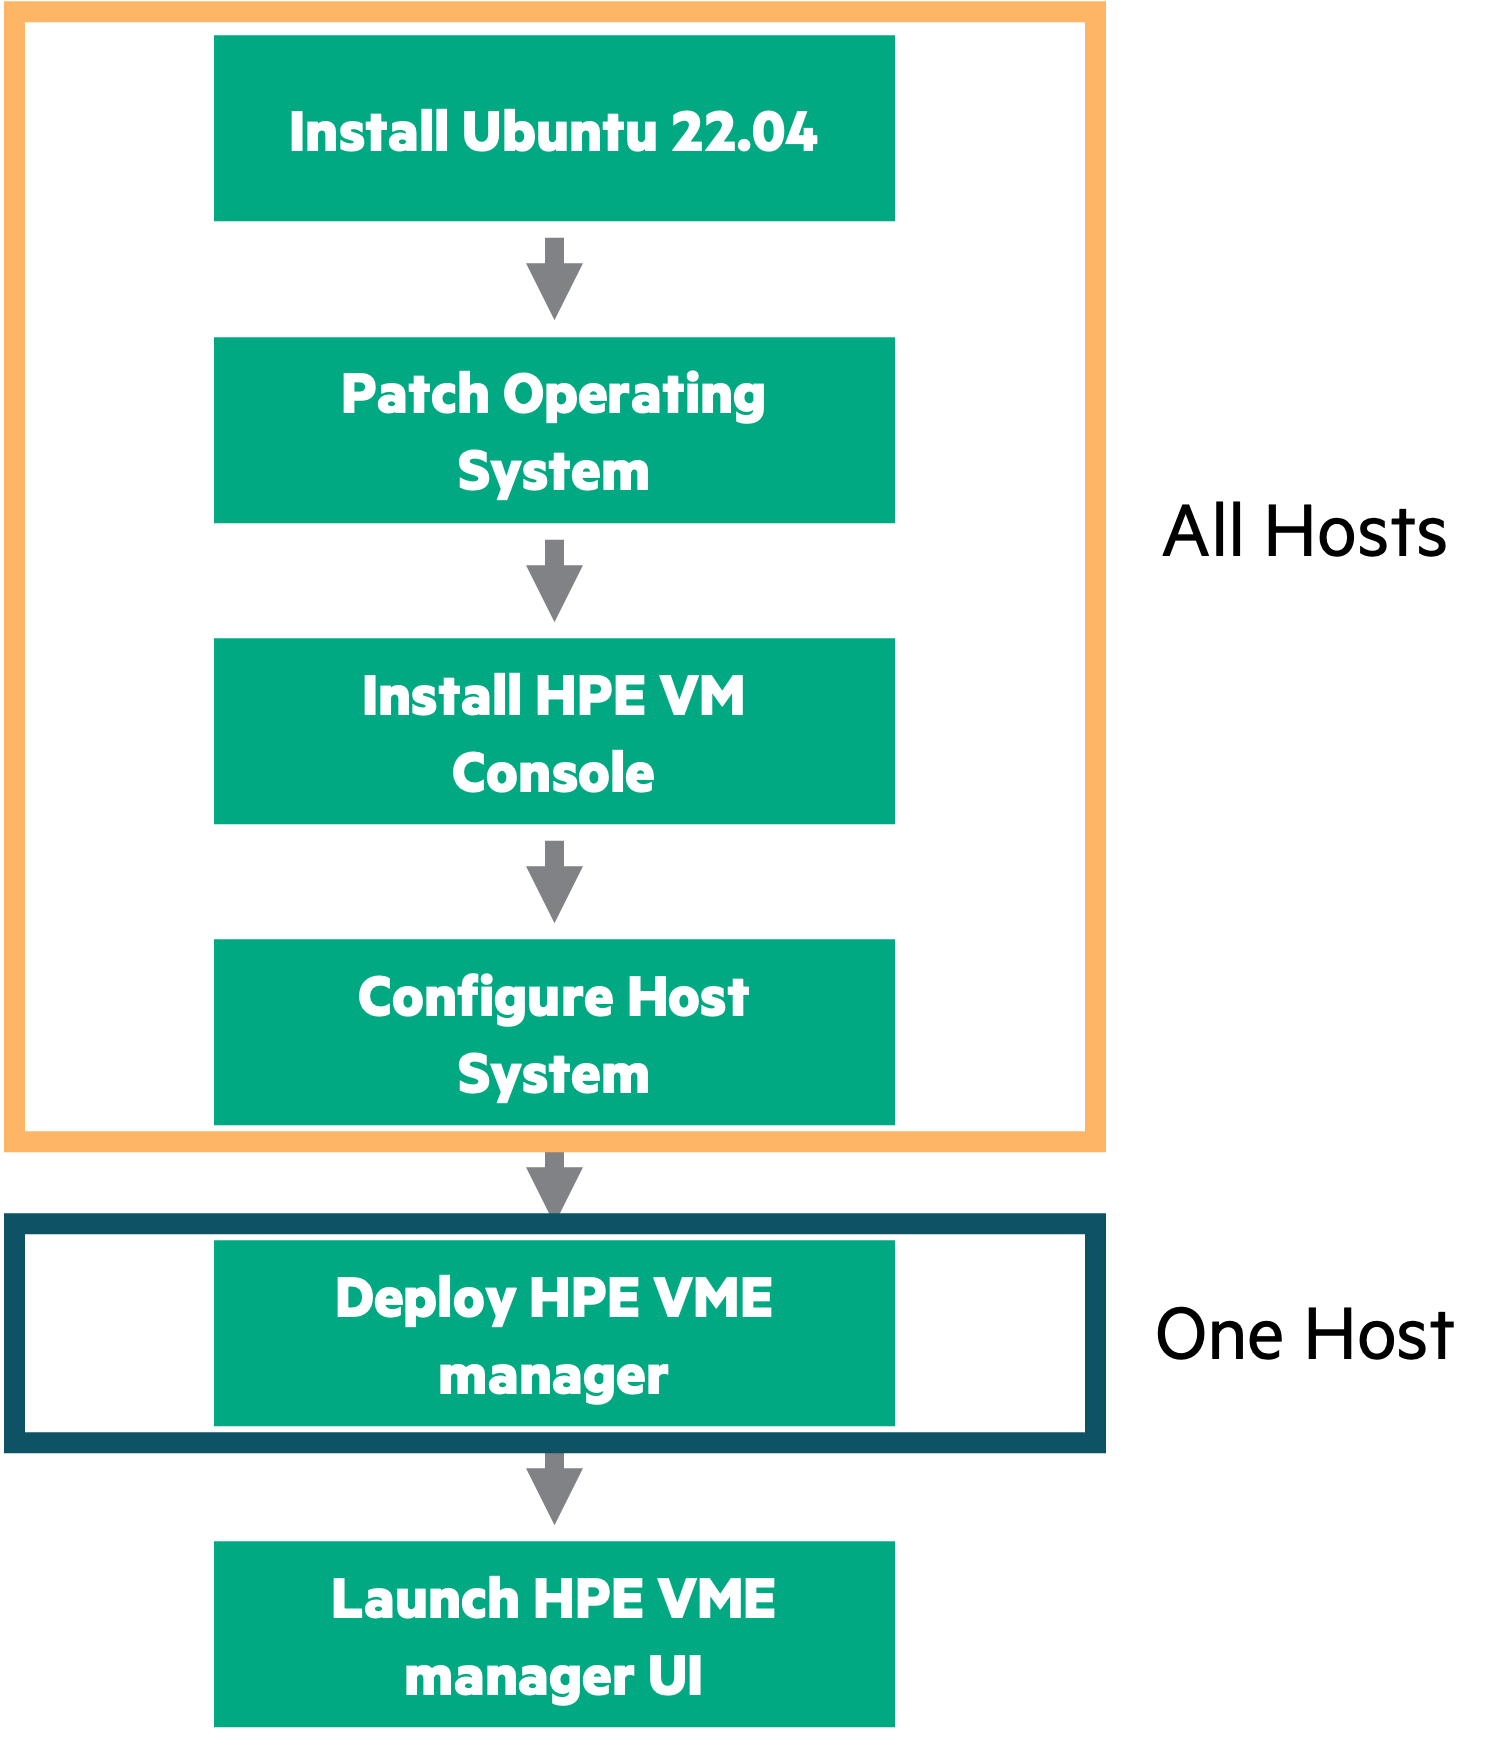
It’s time to begin the actual installation process on the hosts. From a high level, the process is as follows:
Install Ubuntu 24.04 (recommended to use the latest cluster layouts)
Patch Ubuntu 24.04 with the latest updates and security fixes
Install VM Essentials Console. This is a light Debian package that is used to configure the hosts and bootstrap initial virtualization capabilities. This is done on all hosts
Configure the host system for networking, storage, NTP, etc
Deploy the VM Essentials manager using the VM Essentials Console. This is done on only one host
Launch the VM Essentials manager UI
Important
For those establishing clusters running Ubuntu 22.04, compatibility with GFS2 datastores requires hardware enablement (HWE) packages to be installed. This is a set of software components that enables users to run a longterm support version of Ubuntu yet still use newer hardware that might not be supported by the default kernel. Run sudo apt install linux-generic-hwe-22.04 to install HWE packages.
This guide won’t go much deeper than what was already stated above regarding Ubuntu installation and the process of applying the latest patches. We will pick up at this point with the process of installing the VM Essentials console which enables virtualization capability on cluster hosts by installing KVM, OVS, and other packages. This process is repeated on each host that will be part of the HVM cluster. Continuing with this installation guide will require downloading packages from My HPE Software Center. If you are unable to log into the software center or if you believe you are missing software entitlements that should be present, contact your account representative.
Once logged into My HPE Software Center, click on the “Software” section from the side navigation.

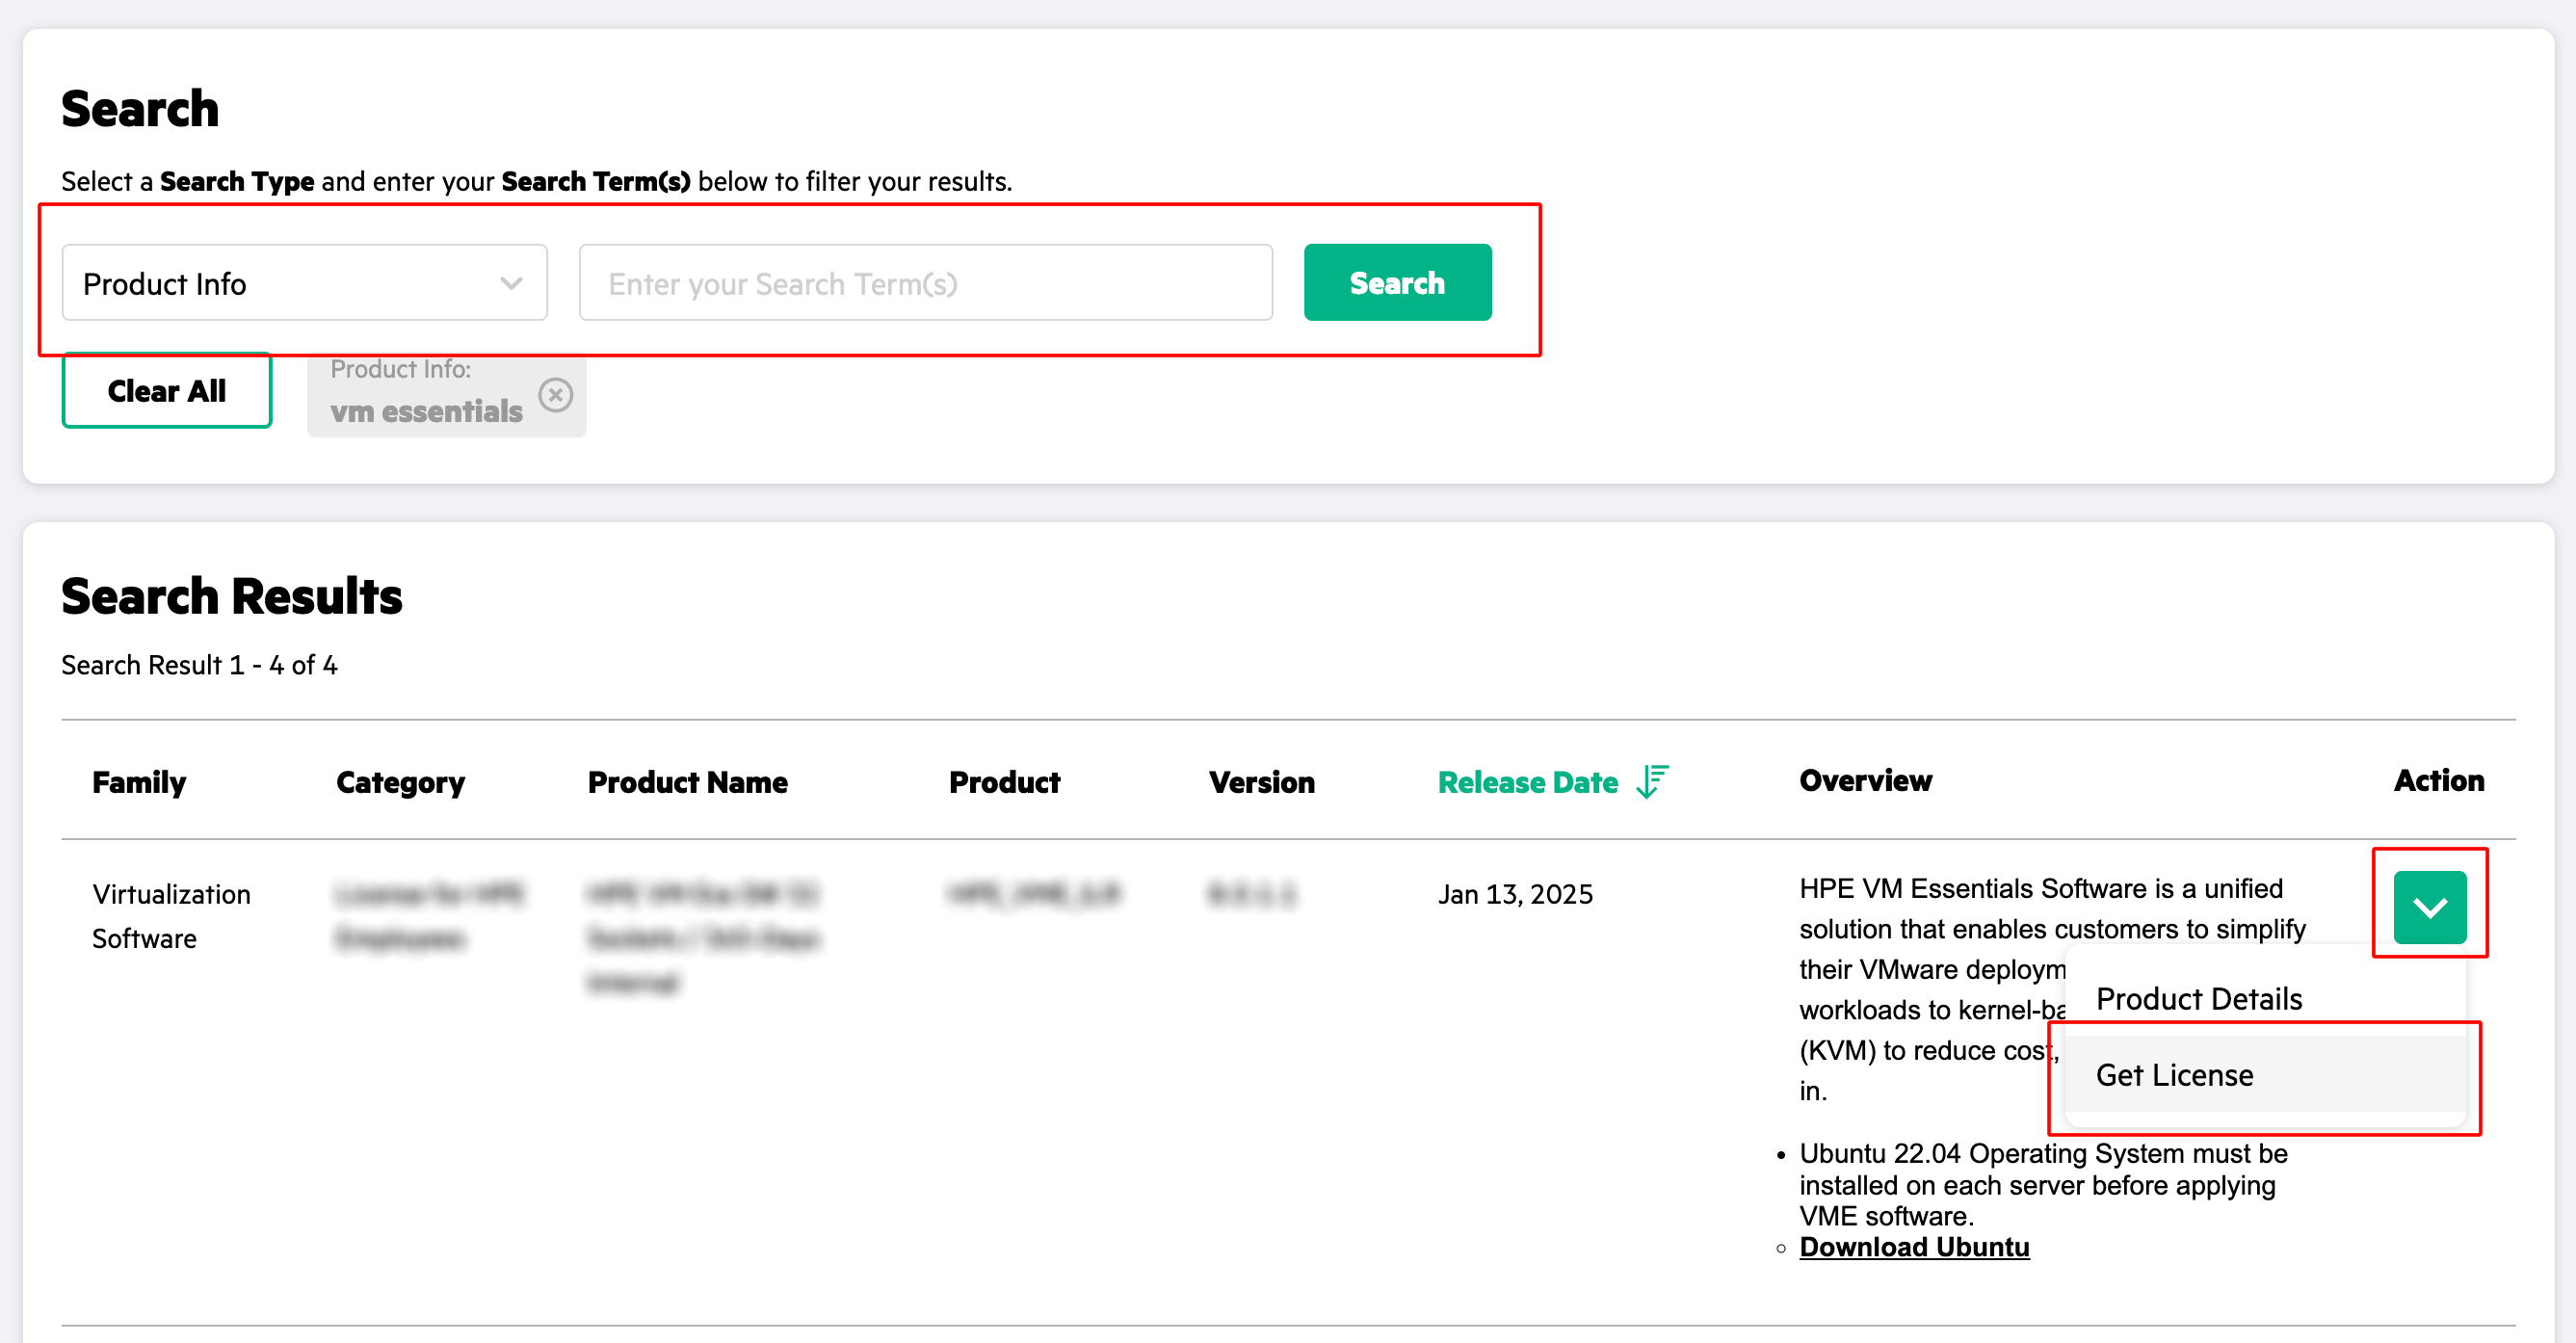
Within the “Software” section, search for HPE Morpheus VM Essentials Software amongst your other software entitlements. A “Product Info” type search for the term “HPE Morpheus VM Essentials Software” may work but depending on the entitlements present in the account and future changes to search functionality, a slightly different search might be required. Once VM Essentials is successfully returned, click on the dropdown menu under “Action” and click on “Get License.”
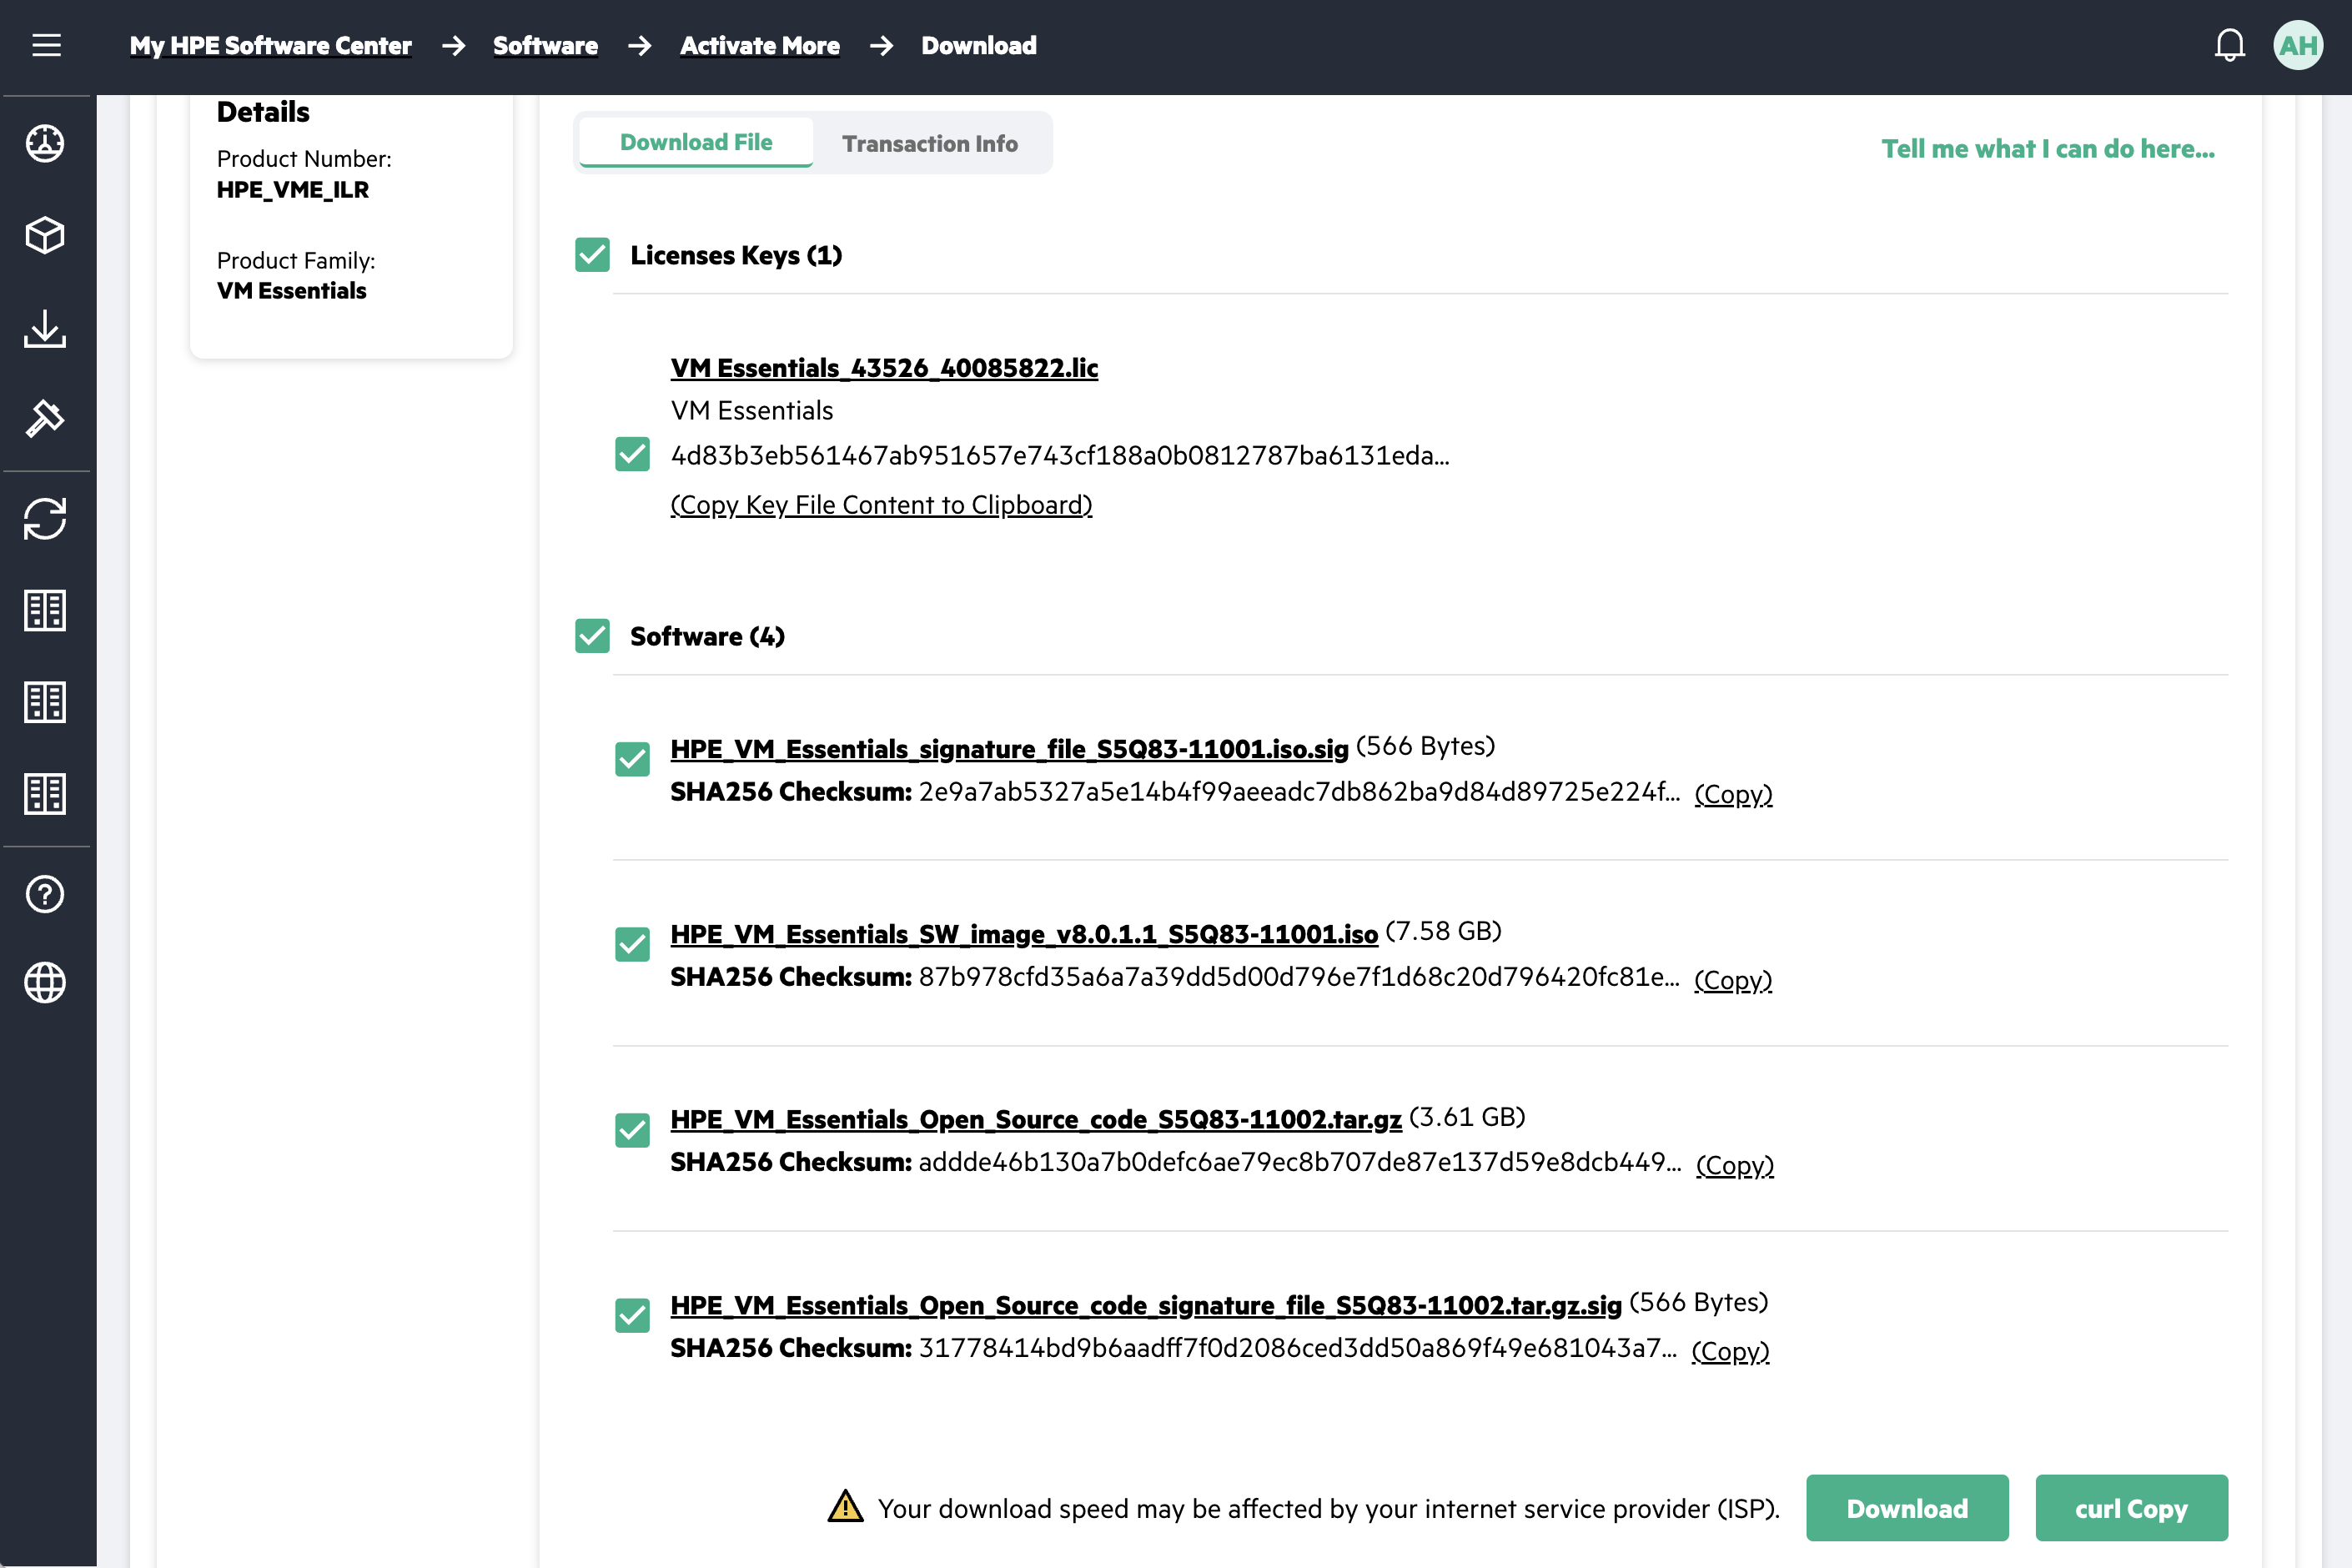
From the download page, you’ll see software packages, signature files and license files. For a fresh installation, the .iso file is the primary download that you need. It contains a debian package and a QCOW2 image which will prep your hypervisor hosts and spin up your VM Essentials manager VM for the first time. Mark the box next to any files you wish to download and then click “Download.” You do not need the separate debian packages offered outside of the .iso as those are only for upgrading a pre-installed VM Essentials manager.
Note
Some commands listed in this installation guide will require superuser privileges.
Mount the ISO to your computer. The exact process will vary by software platform. On Linux, first select a temporary mount point (such as /mnt/iso) or create a temporary mount point if it doesn’t exist (sudo mkdir /mnt/iso). Next, mount the ISO to your temporary mount point (sudo mount -o loop /path/to/file.iso /mnt/iso). Take stock of the files by changing into the proper directory (cd /mnt/iso) and listing them out (ls).
Now that the packages are downloaded and the files contained in the ISO are accessible, copy them over to the hosts. You’ll need to copy the .deb file over to each host but the QCOW image needs to only be copied to the host which will eventually run the VM Essentials manager VM. On Linux, this could be done with scp (scp /path/to/file.deb username@hpevmhost_hostname_or_ip:/path/to/desired/location/) but the copy process will be slightly different for other operating system platforms.
With the Debian package now available to the hosts, go ahead and install it with apt install -f hpe-vm.deb. The “-f” option indicates that a file will be installed. Note that the Debian file name listed here is an example placeholder and the name of your downloaded file will likely be different. When asked if you wish to install all of the packages provided, confirm that you do and then wait for installation to complete. This process is installing on the host all of the packages needed to be part of a virtualization server, including KVM, Libvirt, Ceph, and more.
Important
The rest of this section describes the configuration process within the console for a specific network configuration. Your network configuration may be different and certainly interfaces and VLANs will be differently named. This is meant to illustrate the tools that are available within the console for performing various networking configurations. You may or may not need all of these steps and the specific configurations within these steps may be different in your environment.
With that, the VM Essentials console installation is complete. Enter the console with the following command: hpe-vm.
Note
Some versions of the installer also include an option to install the VME worker. The VME worker is meant for sites where direct SSH communication between the HVM hosts and the VM Essentials manager is not possible. It is a feature of HPE Morpheus Enterprise Software and SimpliVity, it is not compatible with HPE Morpheus VM Essentials Software. More information on distributed workers is available in HPE Morpheus Enterprise documentation
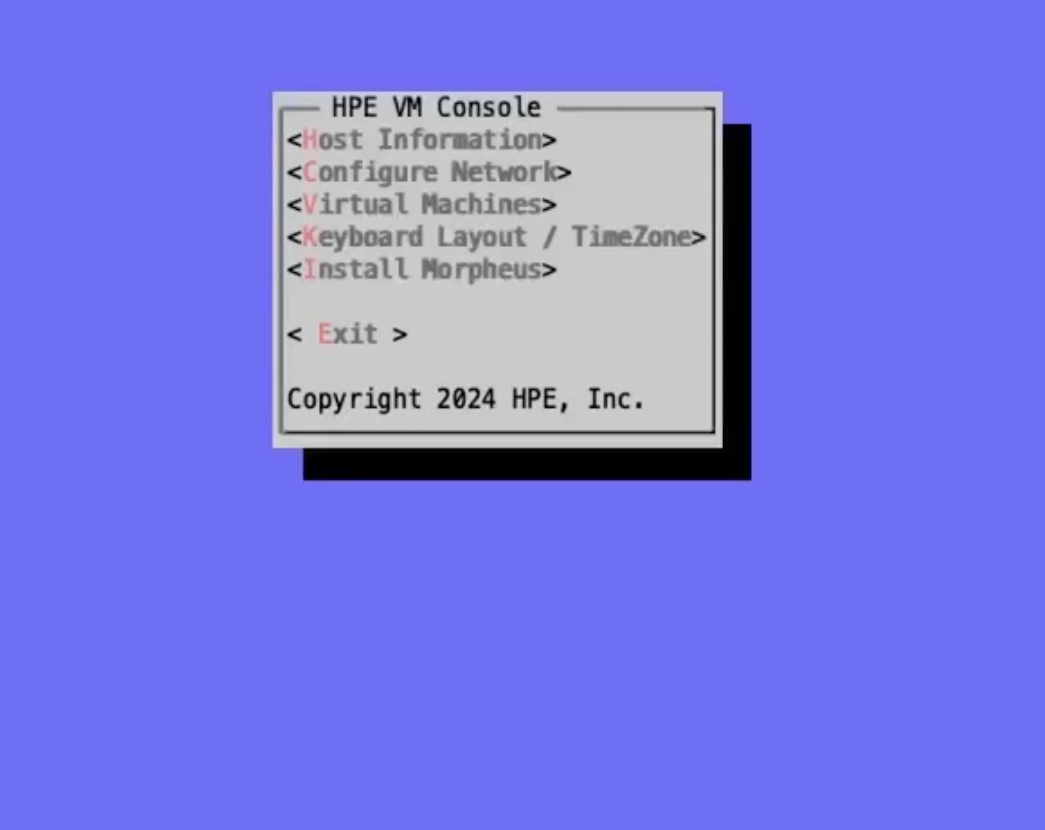
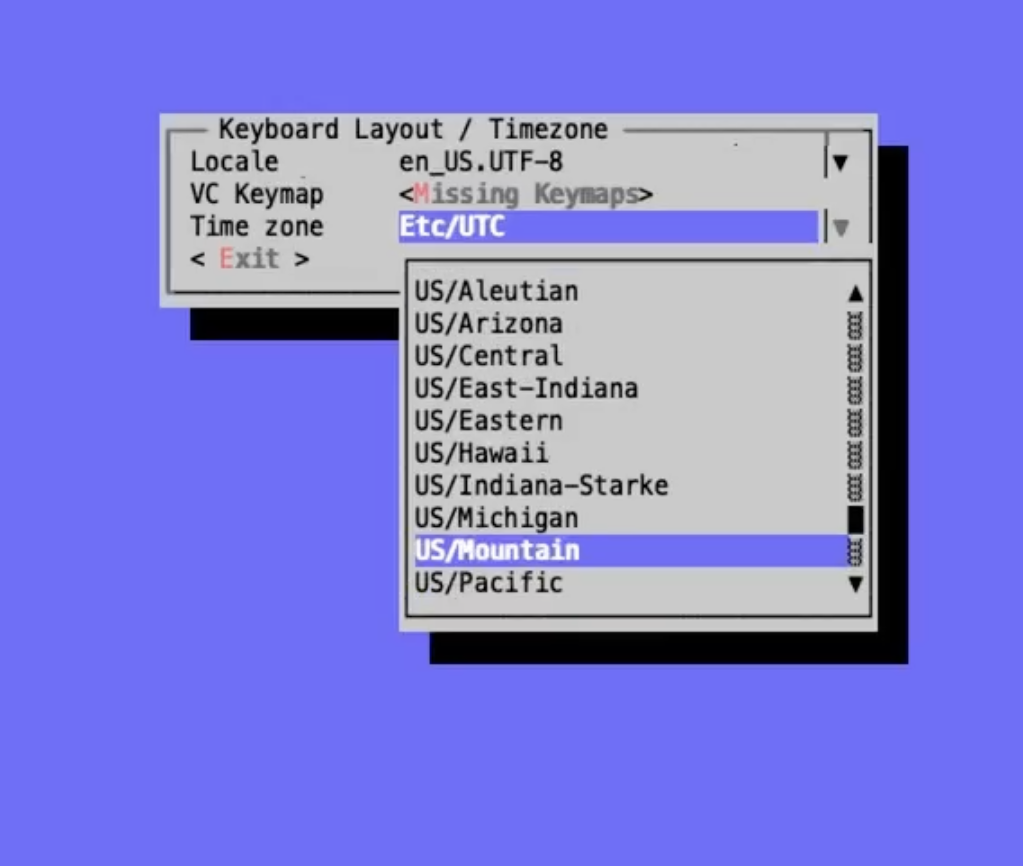
First, enter the section for keyboard layouts and timezones. Set the time and make any changes to the keyboard layout, if needed.
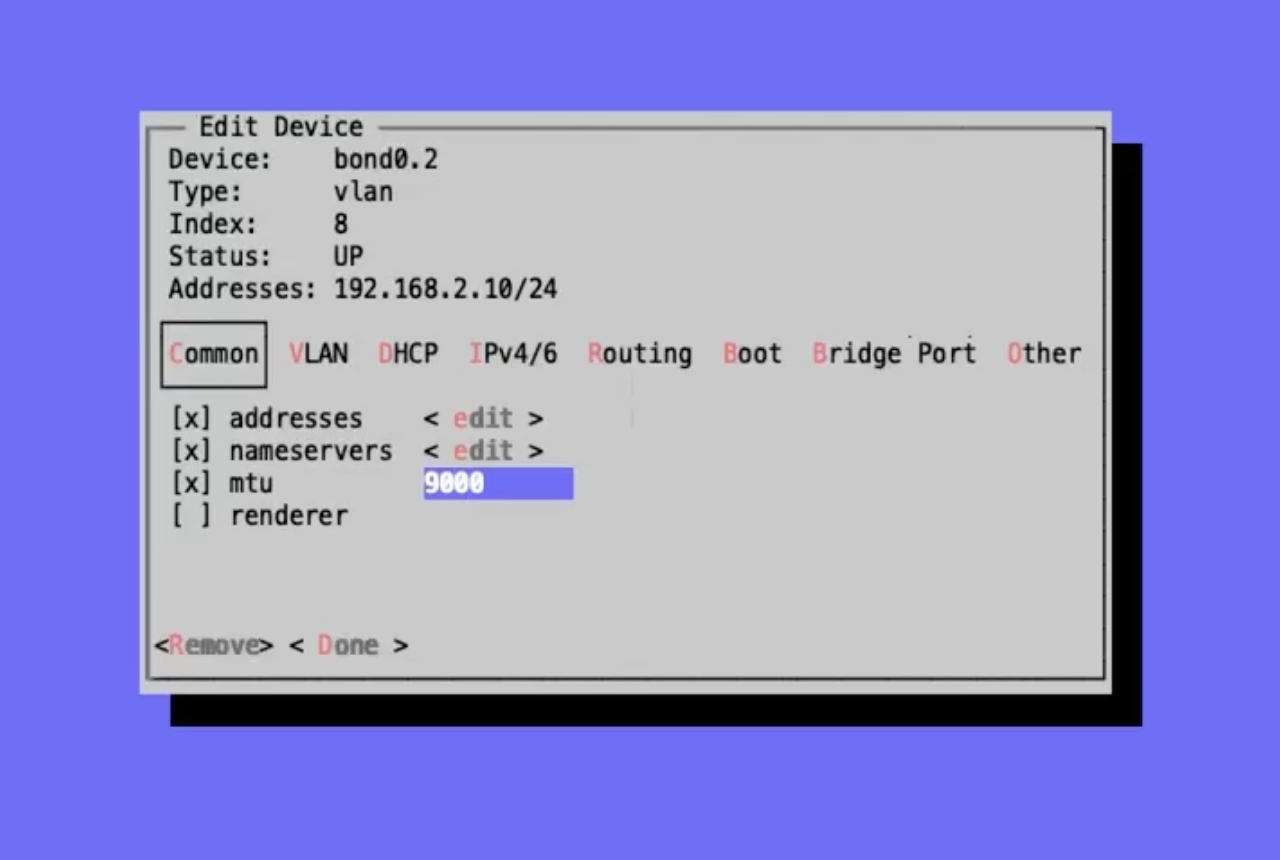
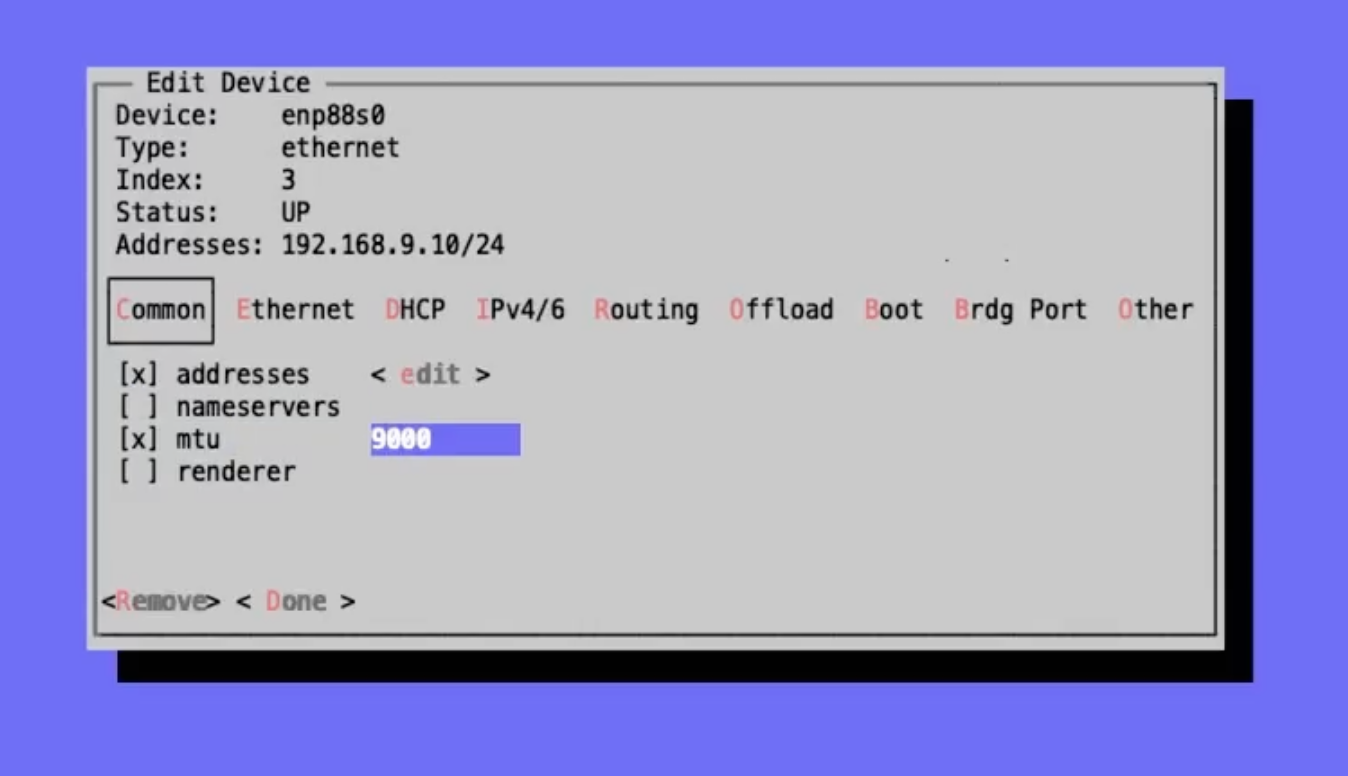
Next, enter the section for network configuration. The first thing that I’ve going to do is set the MTU for relevant interfaces to 9000 (jumbo frames). This has a number of benefits including improved efficiency, reduced latency, and optimization for storage networks. Open the “Device Type” dropdown and choose “vlan”. In my example case, there’s one VLAN which is the “bond0.2” VLAN shown in a prior section. Once selected, mark the box next to “mtu” and enter “9000” in the resulting box. Then, save changes.
Next, use the “Device Type” dropdown to once again select “ethernet” which you saw earlier before switching into the “vlan” section. Using the same process, I will also set the MTU to 9000 on both ethernet devices that make up my bond as well as on the bond itself. To get to the bond, you’d access the bond section from the “Device Type” dropdown in the same way that VLANs and ethernets were accessed. Now that I’ve set MTU of 9000 across the board, I’ll go back to the ethernets section to work with my other two devices (the storage interfaces).
I’ll continue this example by opening each of the two storage interfaces in turn. Three configurations I’ll point out here are “addresses”, “nameservers”, and “mtu”. In this case, I’ll mark the box for “addresses” and provide an address in the pop-up modal that appears. I don’t need to make any other configurations within that modal (lifetime, etc). A nameserver is not needed because the storage network are isolated and don’t need to route out anywhere. Finally, I’m marking the box for “mtu” and setting the value at 9000 as I have with other interfaces. Next, tab over the DHCP section and disable DHCP for this interface. Save the changes and repeat the process for the other storage interface.
Once all of the necessary networking configurations are made, you’ll want to save all changes. This will cause the changes to be applied and take us back to the main screen where we first accessed the timezone section and the networking configuration section. The console will show you that changes are being applied and will respond with a confirmation if they are successful.
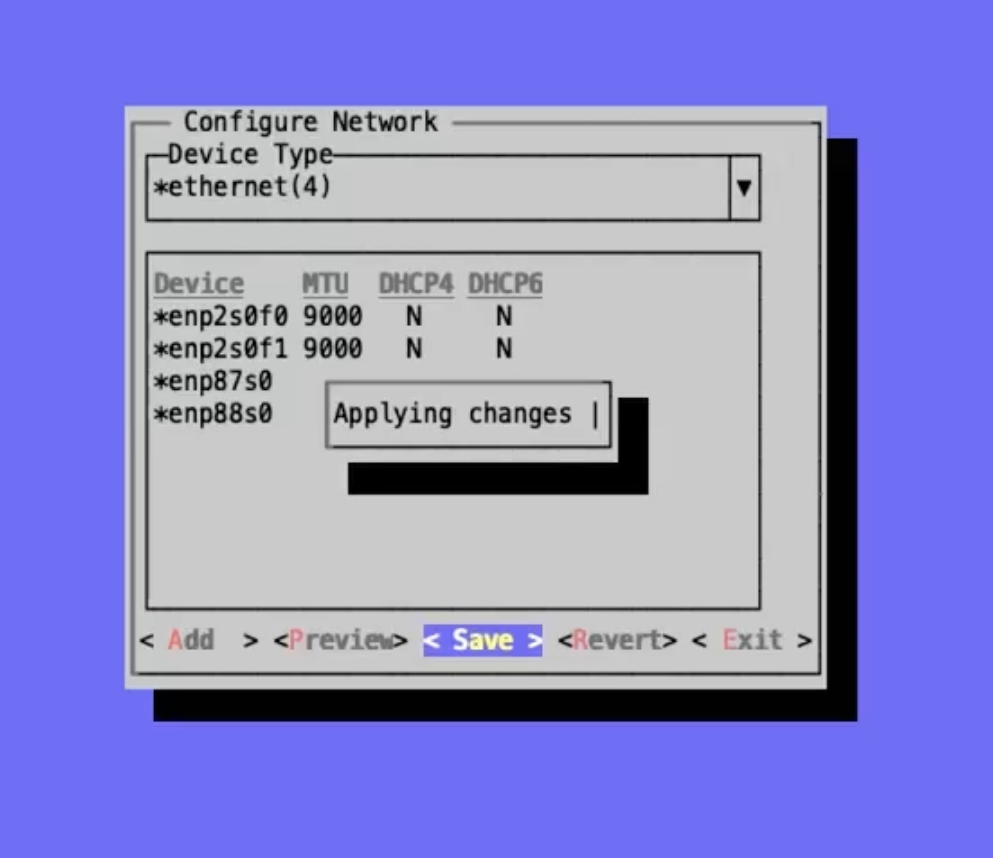
At this point, I am done configuring my example interfaces through the VM Essentials console. It does have some additional functionality not shown here which may be needed depending on your specific network configuration. Make sure to complete this process on all hosts before moving on to the next section which covers the installation of VM Essentials manager onto one of the prepared HVM hosts.
Manager Installation
Having configured the HVM hosts through the VM Essentials Console in the prior step, we’ll now install VM Essentials manager. Unlike the console, the manager is only installed on one of the hosts and serves as the control plane for the server in addition to providing a provisioning engine, automation functionality, monitoring, secrets management, and a lot more. Before starting, make sure you’ve already downloaded the QCOW image for the manager and are aware of its full path on the host you’ve chosen to work from. In fact, it will be beneficial in the next step to go ahead and copy the full path into your paste buffer. The image is available in the HPE software center. Contact your account representative if you are unable to download it using the steps in the previous section.
Before you begin, the following information should be readily at hand:
IP address to give to the VM Essentials manager
URL for the web server
DNS resolution for the URL (points the URL to the manager IP address)
VLAN the manager should be deployed on
Management interface name
Compute interface name
To install the manager, go back into the console as we did in the previous step using the hpe-vm command. This time use the selection labeled “Install Morpheus”. Morpheus was the original name for VM Essentials manager. Here we are given a modal containing some configuration options we must set in order to stand up VM Essentials manager.
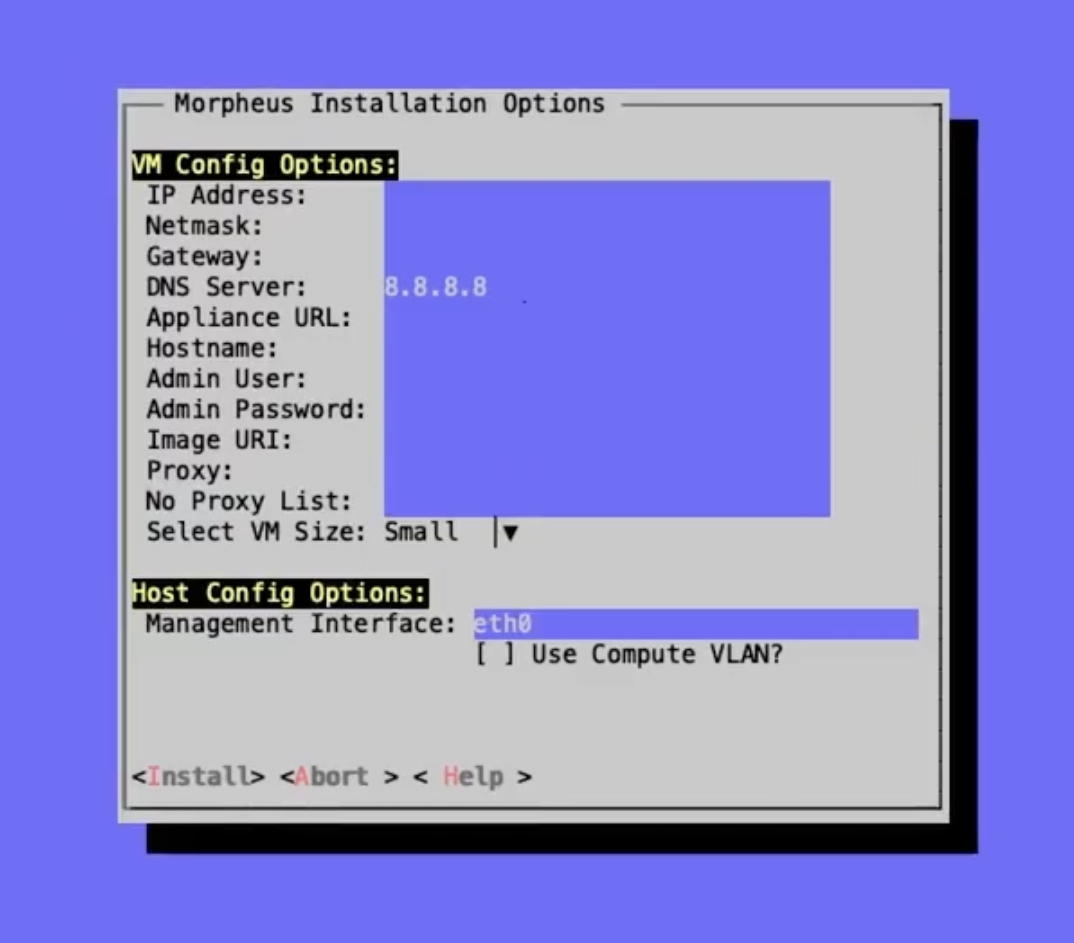
Let’s first paste in the path to the manager image since it’s already in the paste buffer from a step earlier in this section. In the “Image URI” field, first type “file://” and then paste in the file path. Since the path begins with a leading “/” the final configuration value will look something like “file:///path/to/file.qcow2”. After entering the URI, configure the following fields using the information mentioned previously you should have available for this step:
IP Address
Netmask
Gateway
DNS Server
Appliance URL
Hostname (same as the appliance URL without the FQDN)
Note
Once a host is initially set up over SSH, communication to the VM Essentials manager is mostly handled through an outbound connection from an agent running on the host to the Manager VM. This makes the Appliance URL configuration very important. This is the HTTPS URL the agent will connect to from within each hypervisor host. The one exception are hypervisor console sessions which still go through SSH.
After filling in those fields, enter a username and password for an SSH user that can be used to get into the manager machine. Following that, if necessary, configure any proxy details.
The final configuration to make here involves specifying the size of the manager machine, either small, medium, or large. Each of the respective sizes consumes the following amount of resources:
Small: 2 vCPUs and 12 GB RAM
Medium: 4 vCPUs and 16 GB RAM
Large: 4 vCPUs and 32 GB RAM
The greater the capacity, the greater amount of resources and cluster sizes the VM Essentials manager can manage. For large production environments, it’s recommended you select a large manager. After selecting the size, you’ll need to identify the management interface and (if using) the compute interface and compute VLAN tag. Following all of these configurations, select “Install”.
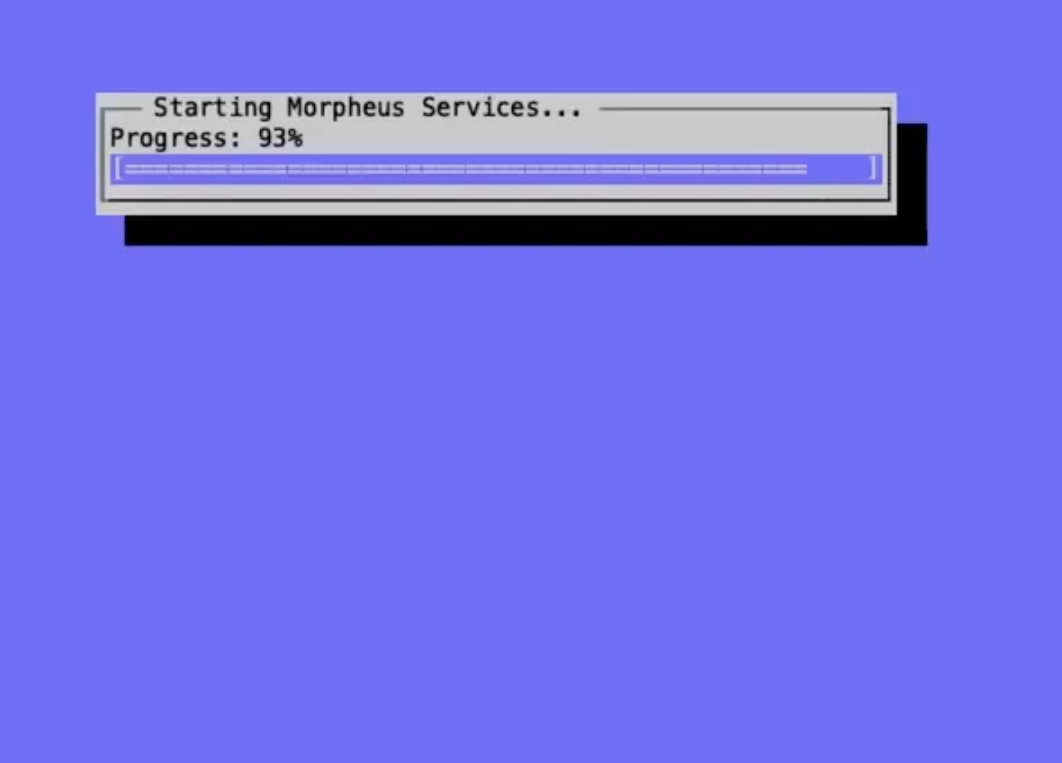
At a certain phase in the install process, you’ll see a message in the progress bar modal stating “Starting Morpheus Services…”. At this point, you can direct a web browser to the appliance URL and see if you can access the appliance. If you get a response returned, even if it’s just telling you the appliance is still loading, that’s a good sign the web server is installed and things are working. Once all is well, you will arrive at a setup page which leads us into the next section on setting up VM Essentials manager.
Manager Initialization
With VM Essentials manager up and running, you can now access the UI frontend by pointing your web browser to the appliance URL that you set in a previous step. You should see a registration screen like the one below.

You’ll need a license to go much further with the product. If you’ve followed this guide up to this point, you should already have your license key downloaded from My HPE Software Center. If not, you can log back in any time an re-download the file containing the license key. If you choose to skip entering a license key at this time, a short-term evaluation license will be applied. This can be upgraded to a full license at any time from the global settings section of the application.
The rest of the process involves naming the account on the manager and entering the details for your initial administrator user. Next, provide a name for the appliance, confirm the appliance URL is correct as entered, and choose from a few global enablements (for backups, monitoring, and logs).
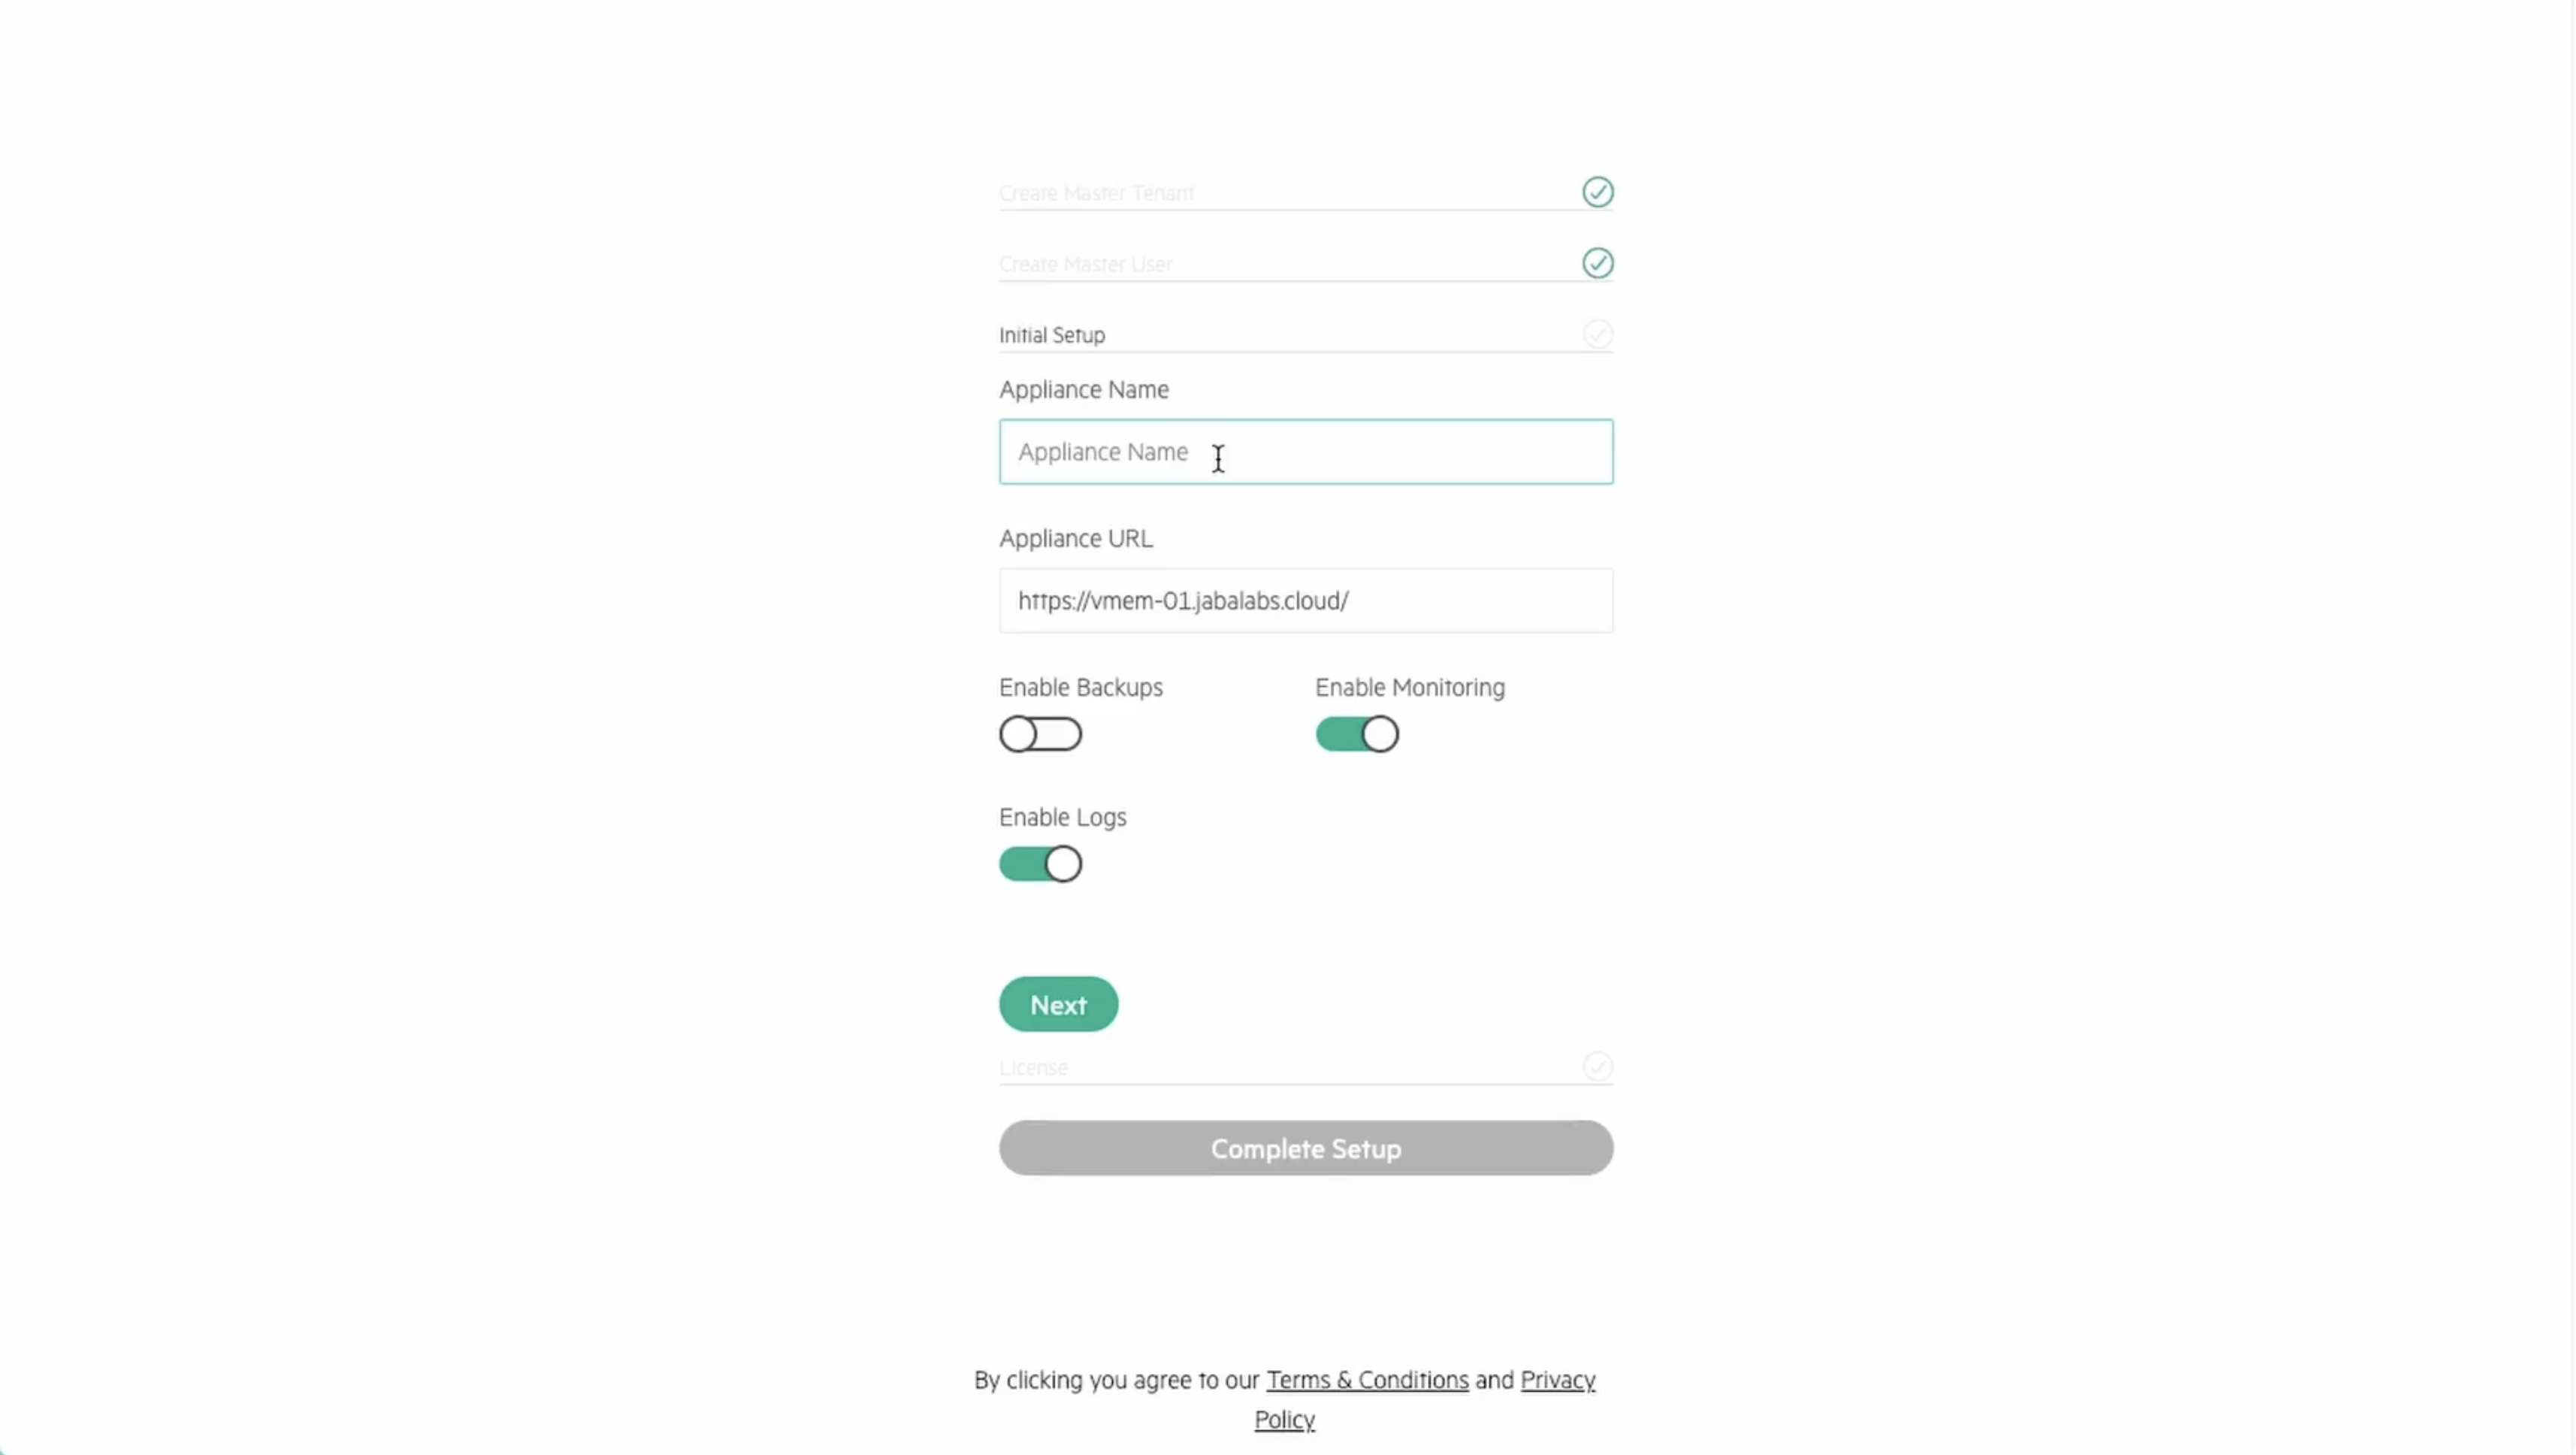
After clicking through to the next section, you will paste in your license key. Click “Complete Setup” and you will be dropped into the UI for the first time. Installation is now complete!
At this point, you are ready to move on to the next section which goes over the initial environmental setup steps that must be undertaken to add the first HVM cluster to the VM Essentials manager.
Upgrading the Manager
To upgrade the VM Essentials manager, you’ll need to obtain the .deb upgrade package(s) from the HPE Software Center. Reach out to your account manager if you’re unable to access the downloads as described in the next paragraphs. For an upgrade, you’ll need the debian package (not the ISO, which is for first-time installation). If you are performing an offline upgrade, you will also need the “supplemental” debian package.
Once logged into My HPE Software Center, click on the “Software” section from the side navigation.
Within the “Software” section, search for HPE Morpheus VM Essentials Software amongst your other software entitlements. A “Product Info” type search for the term “HPE Morpheus VM Essentials Software” may work but depending on the entitlements present in the account and future changes to search functionality, a slightly different search might be required. Once VM Essentials is successfully returned, click on the dropdown menu under “Action” and click on “Get License.”
From the download page, you’ll see software packages, signature files and license files. Mark the checkbox next to any that you need and download them to your computer.
For an upgrade, we only need the .deb file available in the software center (and potentially the “supplemental” debian package as well if this will be an offline upgrade). To continue, copy the .deb file(s) over to the VM Essentials manager VM. On Linux, this could be done with scp (scp /path/to/file.deb username@<VM IP address>:/path/to/destination). You’ll need the VM user’s password unless you’re using SSH keys.
With the .deb file in place, we need to open a console connection to the VM Essentials manager VM to perform the actual upgrade. There are a number of methods to accomplish this but below are two examples from either an HVM host or from your own computer.
From the HVM host
Confirm the manager VM name (virsh list) and connect with virsh console <vm name>. This starts a local VNC serial connection. This method only works if the host has GUI capabilities installed, which means the host must be running Ubuntu Desktop or Ubuntu Server with GUI services installed.
From another computer
Confirm the manager VM name (run virsh list on the HVM host). Next, make note of the VNC port and password for the VM Essentials manager VM. This is done by running virsh edit <vm name> on the HVM host and finding it within the block beginning <graphics. This block is typically near the bottom of the XML. Having obtained this information, move back over to your own computer (must be a computer with a desktop terminal, access to the VME host, and GUI capabilities). Connect to the SSH tunnel: ssh -L <VNC PORT>:127.0.0.1:<VNC PORT> <VME Host User>@<Host IP/hostname>. Then, using a VNC viewer (for example, VNCViewer64), connect to localhost:<VNCPort>. Use the password obtained from the VM XML viewed earlier.
Having copied over the needed files and connected to the VM Essentials manager VM, the upgrade is completed in just a few commands. These commands will stop the current services, install the package, and then reconfigure the Manager. Replace the placeholder .deb file in the commands below with the correct path and file name of the package you’ve copied over.
Important
Upgrading VM Essentials manager will result in downtime of at least a few minutes. Ensure users are not doing critical work during the upgrade window. This downtime applies only to the Manager itself and has no effect on the hypervisor host(s) or any provisioned VMs currently running.
sudo morpheus-ctl stop morpheus-ui
sudo dpkg -i xxxx.deb
sudo dpkg -i xxxx.supplemental.deb  # Optional -- Only for offline upgrades
sudo morpheus-ctl reconfigure
All services will automatically start during the reconfigure process. After the reconfigure has succeeded, tail the UI service to watch UI startup logs with morpheus-ctl tail morpheus-ui. Once the UI service is up and running, the upgrade process is complete. Attempt to reach your appliance normally through a web browser to confirm success.
Note
Services will be stopped during package installation and started during the reconfigure process, including the morpheus-ui service. If the reconfigure process is interrupted or fails, the morpheus-ui service may need to be manually started or restarted. In certain situations if another service hangs on starting during reconfigure, run systemctl restart morpheus-runsvdir then reconfigure and restart morpheus-ui if successful.
Upgrade Compatibility Table
| From Version | To Version | |||||
|---|---|---|---|---|---|---|
| 8.0.1 → | 8.0.2 | 8.0.3 | 8.0.4 | 8.0.5 | 8.0.6 | |
| 8.0.2 → | 8.0.3 | 8.0.4 | 8.0.5 | 8.0.6 | ||
| 8.0.3 → | 8.0.4 | 8.0.5 | 8.0.6 | |||
| 8.0.4 → | 8.0.5 | 8.0.6 | ||||
| 8.0.5 → | 8.0.6 | |||||
| Upgrade Supported | ||||||
| Upgrade Not Supported | ||||||
Initial VM Essentials manager Setup
With VM Essentials manager now installed, you’re dropped into the UI and want to get up and running as quickly as possible. This section goes over some useful first steps for configuring the environment, locating useful features, and adding the first HVM cluster.
Global Settings
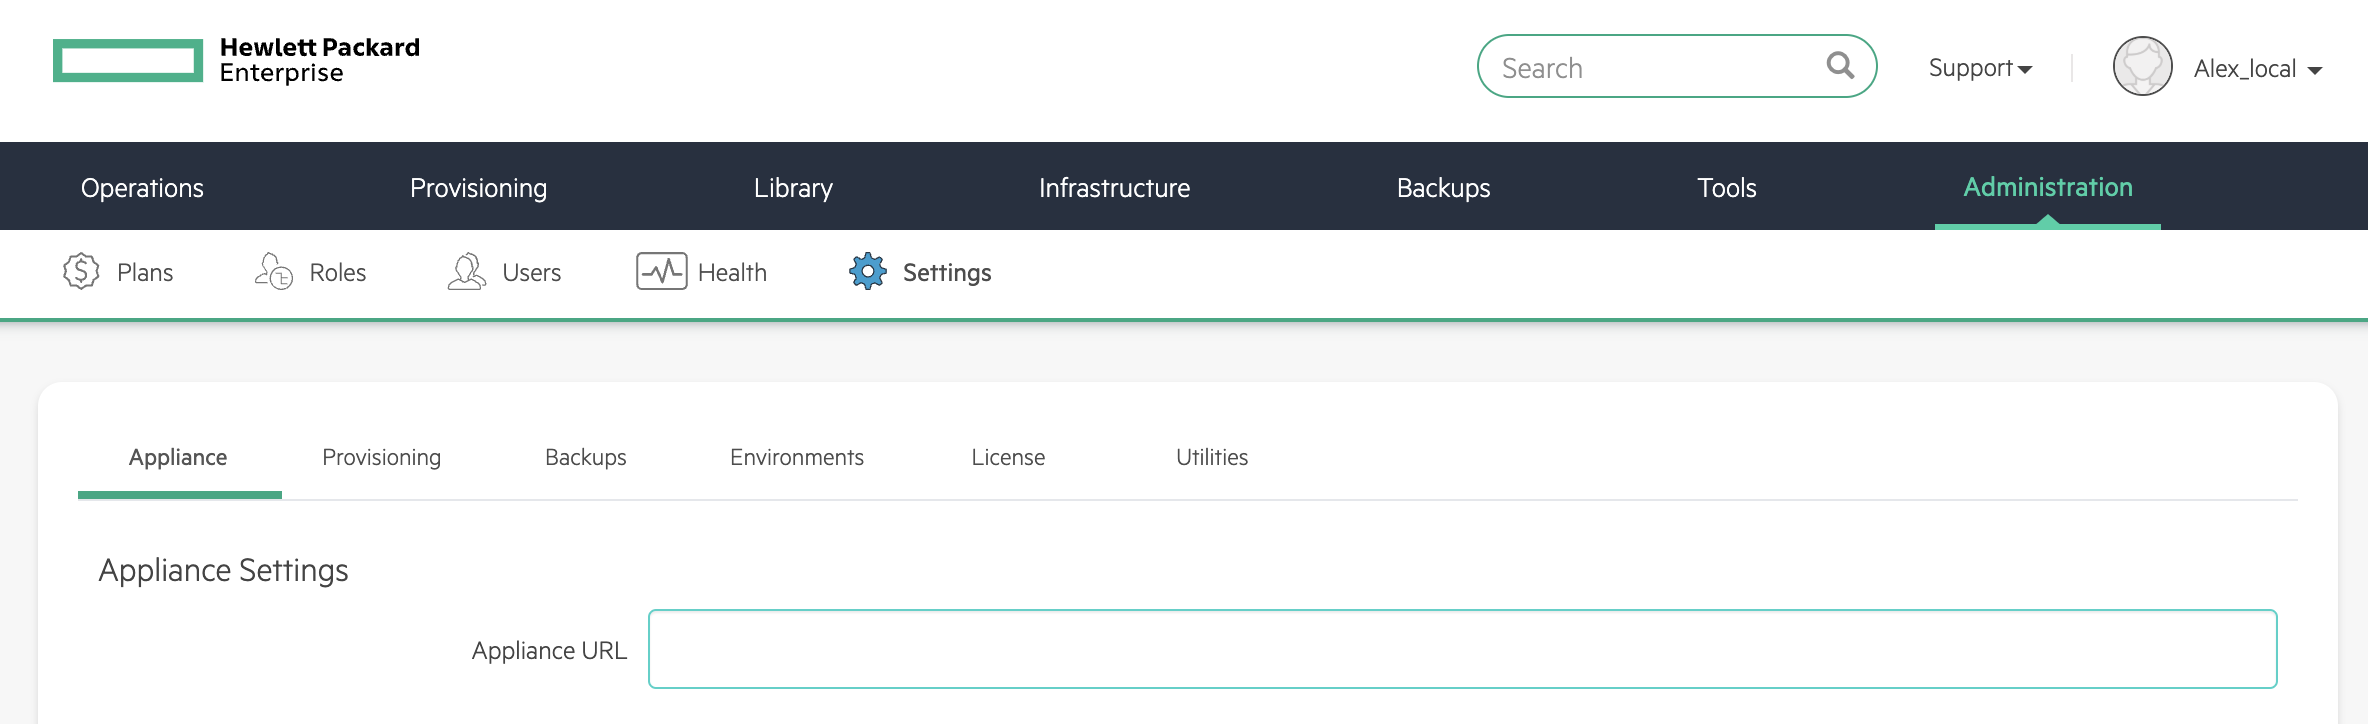
A useful first stop is in global settings (Administration > Settings). Within the Appliance category, check and fill an “Appliance URL” value. This is the default value for VM Essentials Agent installation and functionality. All Instances and hosts must be able to resolve and reach this URL over port 443 for the Agent to install and function properly. Individual Clouds can also have an individual Appliance URL which supersedes the global one set here. While here in the Appliance category, consider checking the “Skip Agent Install” toggle. If on, this toggle will be set by default in the Instance provisioning wizard. If off, this toggle will not be set by default in the Instance provisioning wizard. If your default stance is to install the Agent and maximize the value provided for workloads running on HVM clusters, this toggle should be off.
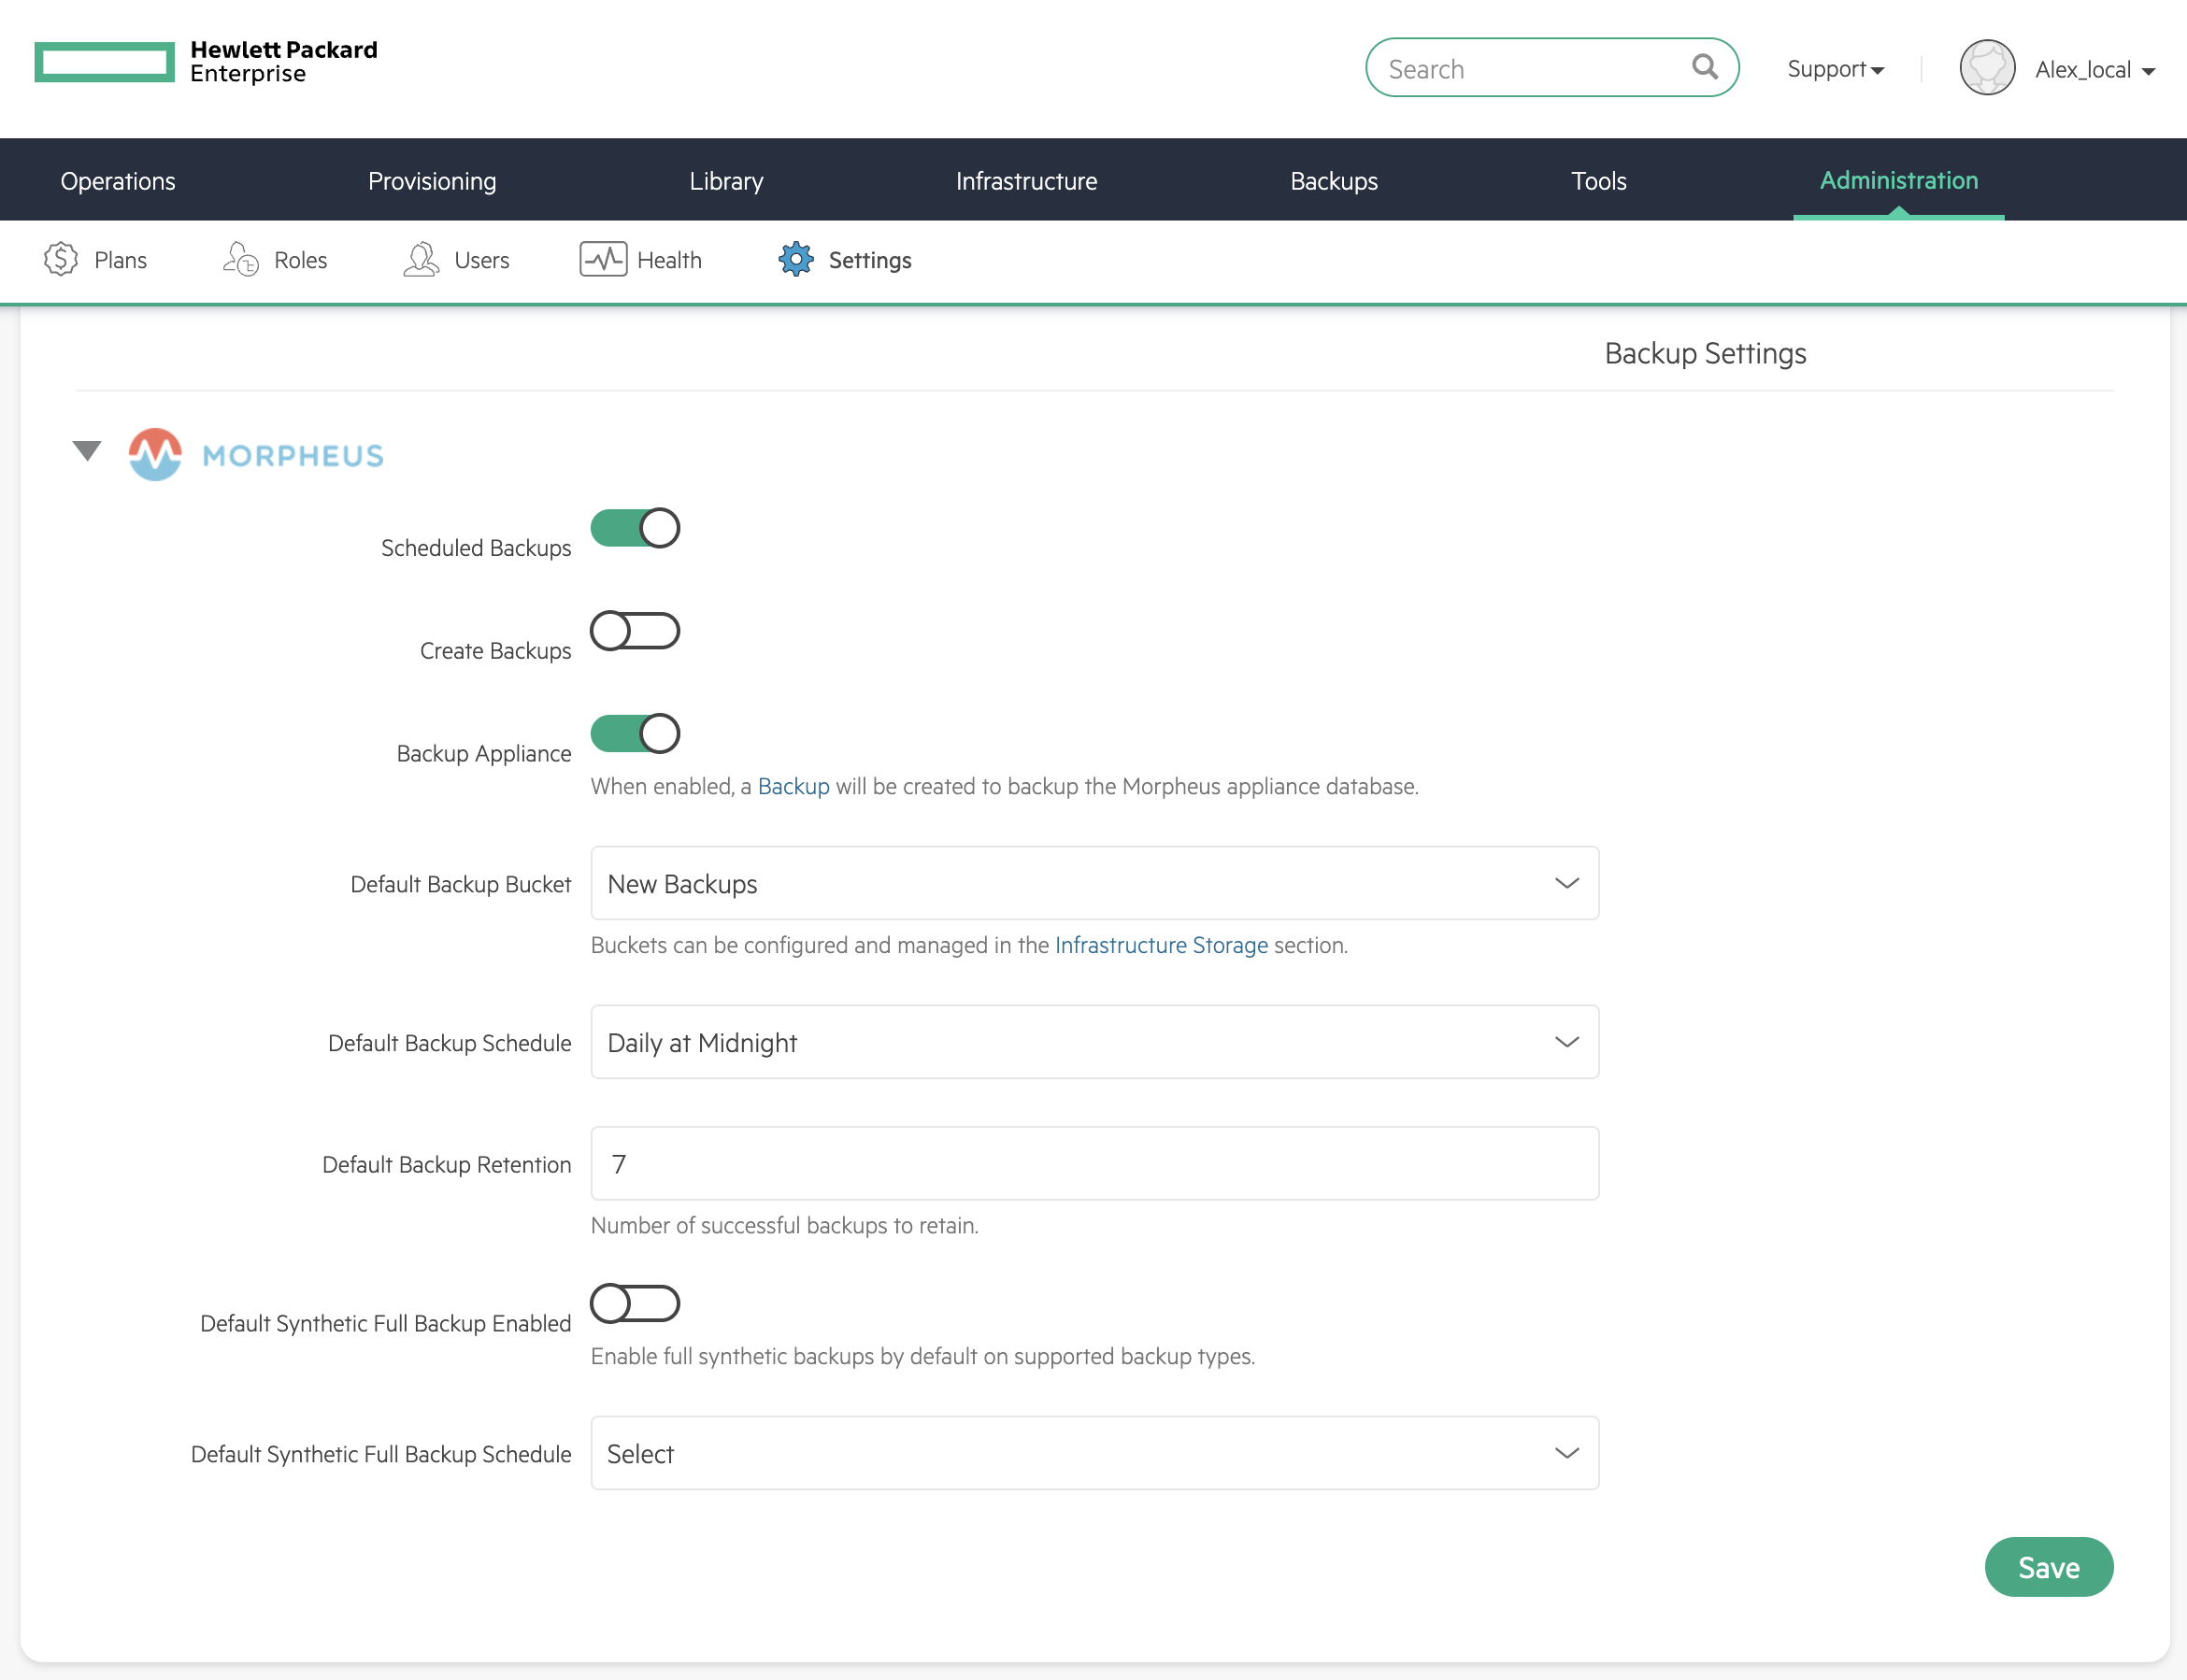
Next, check the Backups section which houses global settings related to backups. If “Scheduled Backups” is toggled, default automatic backup settings will be pre-set each time you begin to configure a new Instance through the Instance provisioning wizard. These default backups will target the default bucket, schedule, and retention settings you see here. This is a good time to double check your default backup bucket and retention settings as it is possible to backup Instances directly to the VM Essentials manager VM. If you fill the Manager’s disk with backups you could bring the Manager down.
One last area to check is the License section. Here you can check your usage against licensed maximums as well as apply new licenses. If you started the Manager using the built-in trial license you will have to return here at some point to apply a full license.
See the global settings section of VM Essentials documentation for complete details on settings.
User Settings
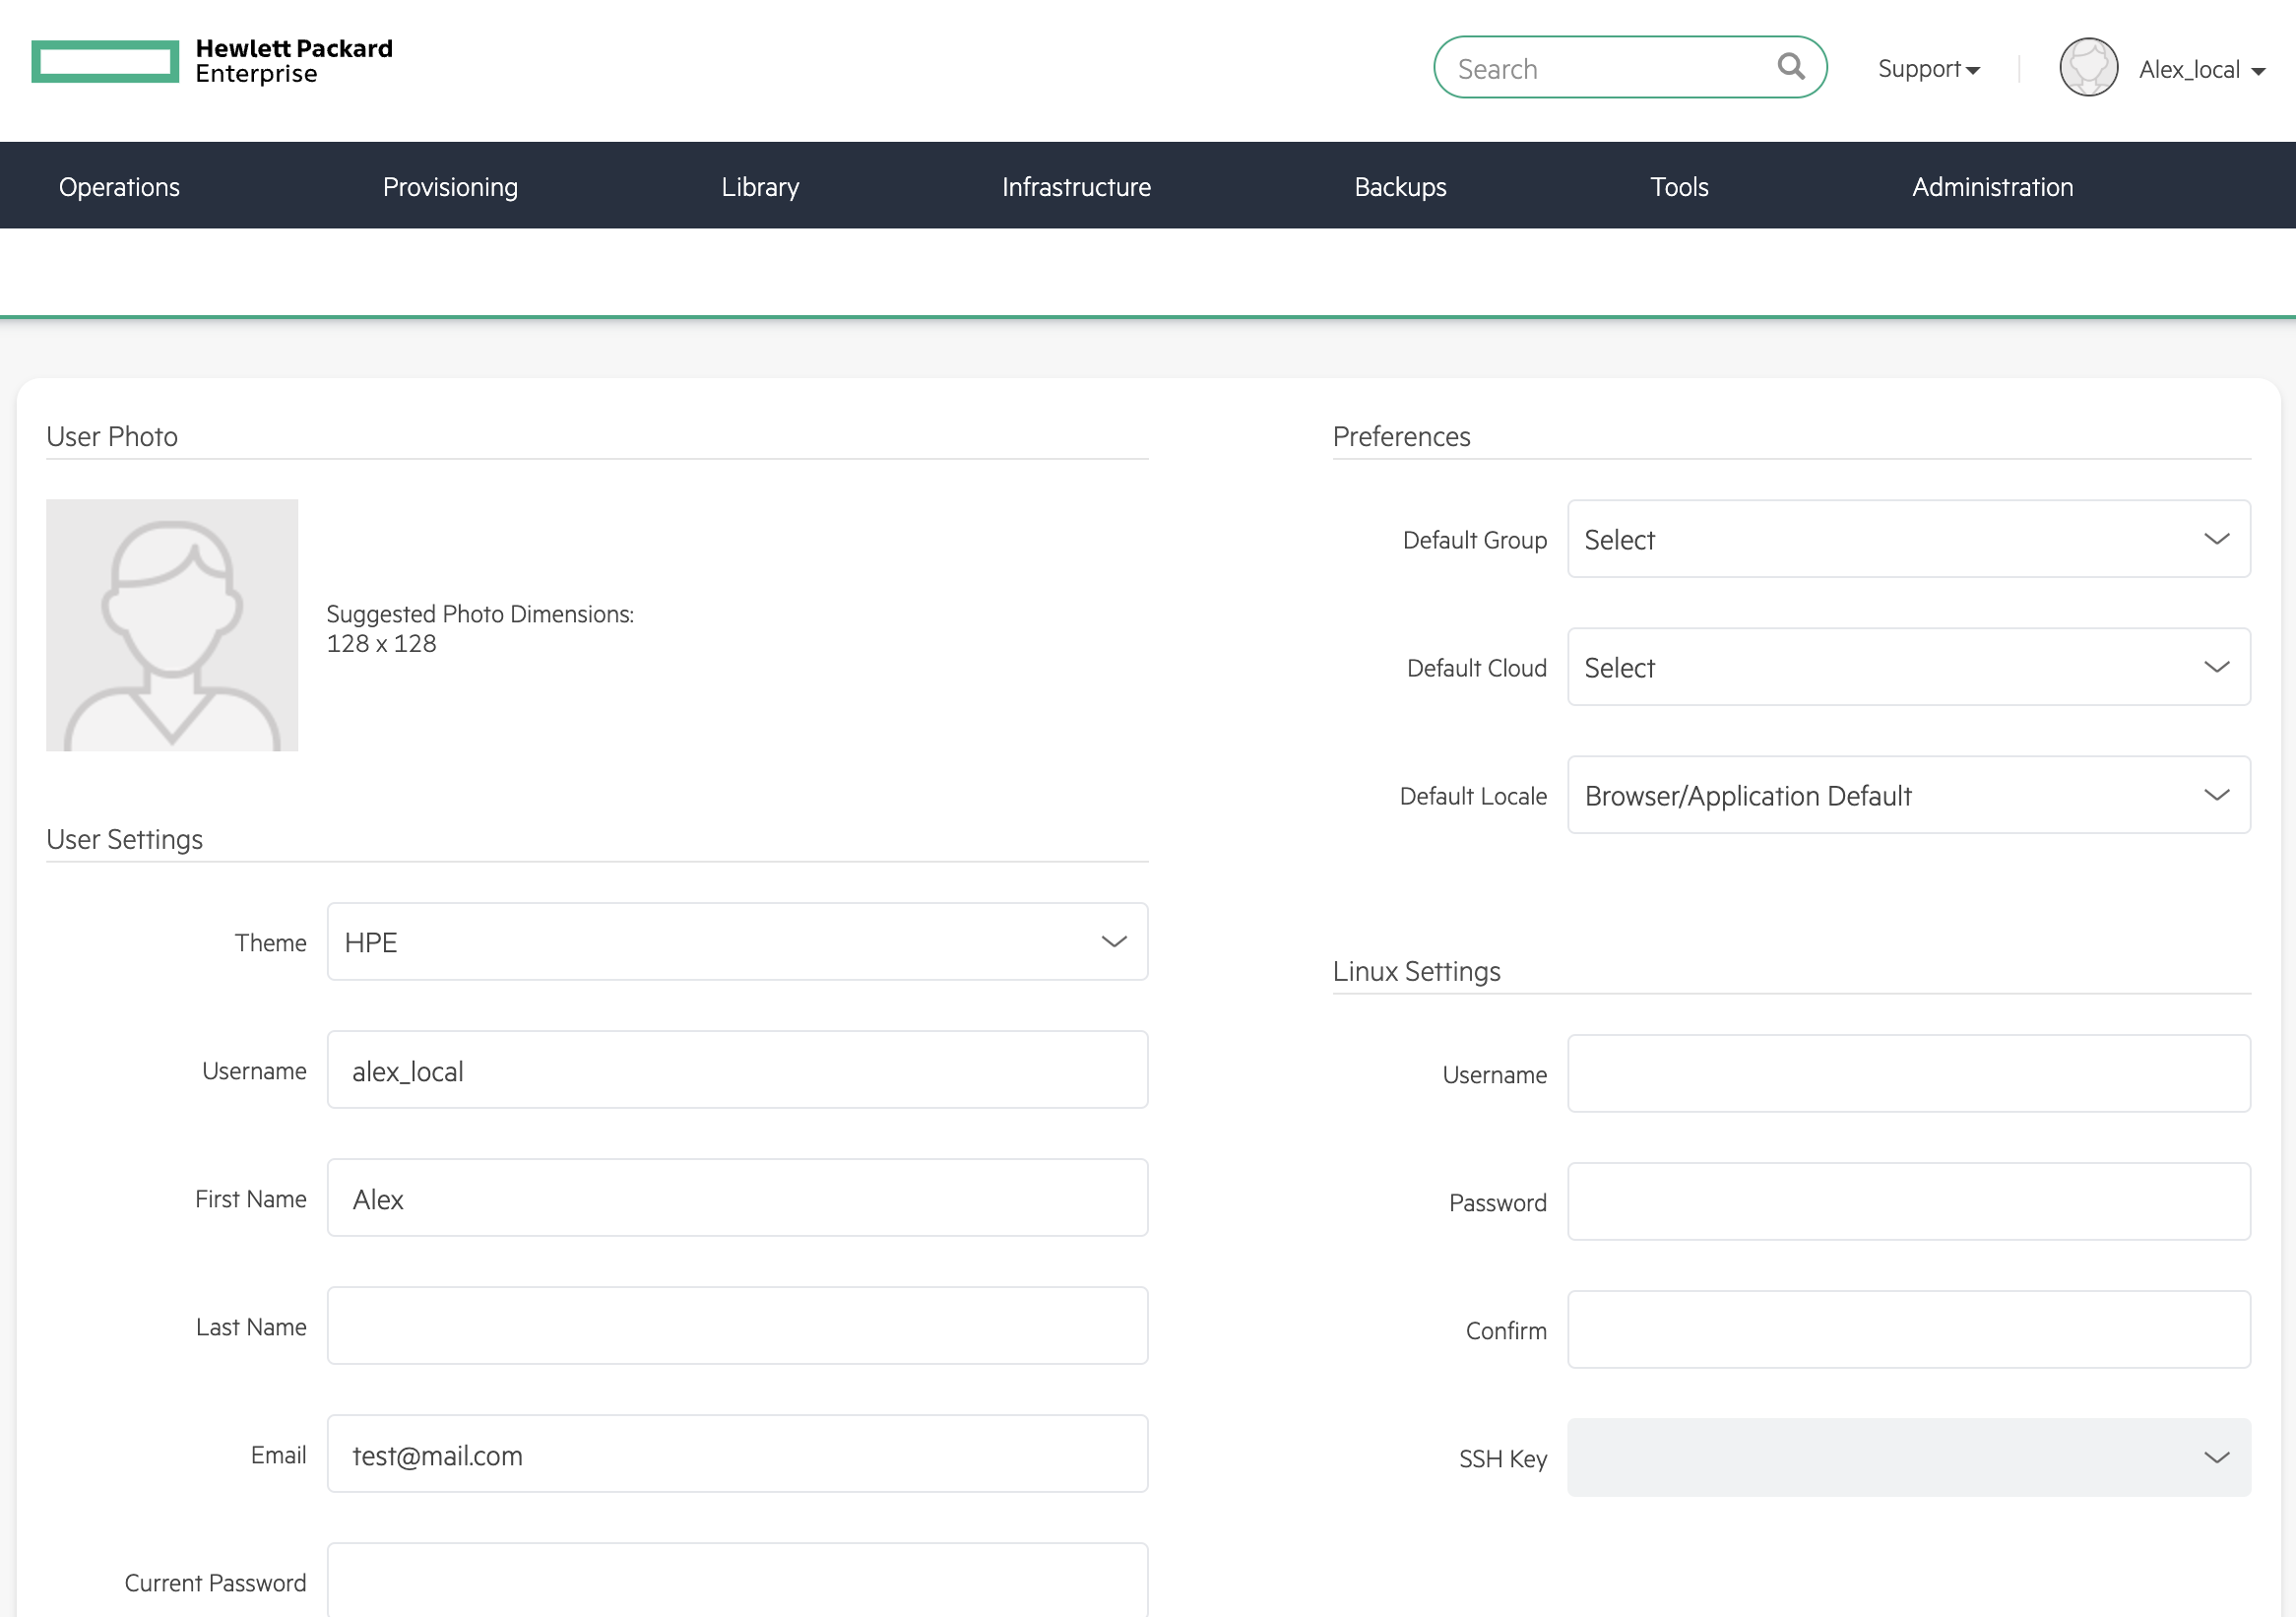
Next, check User Settings. User Settings is accessed by clicking the user’s name in the upper-right corner of the application window and then clicking “USER SETTINGS”.
Some settings you may want here include “Email” which will ensure any automatic email generated by the Manager (such as Instance provisioning success messages) arrives at a place it can be seen. Setting a default Group and Cloud is also useful as new workloads will begin with your most-used Group and Cloud set by default, which will save a lot of clicks over time. If you haven’t yet created your first Group and Cloud (covered in a later section), come back later to set that default. Finally, it’s useful to configure a Linux and Windows user here. At provision time if you opt for your user to be added to provisioned Instances, a user will be added with your indicated username, password, and public key (if specified, you must have an existing SSH keypair in the Manager) for easy access to any running workload. API access settings and 2FA settings are also here.
Creating Groups and Clouds
You won’t be able to add your first HVM cluster without a pre-existing Group and Cloud. Groups define logical groupings of resources and users access those resources based on the Groups associated with their Roles. A Cloud can represent a grouping of HVM clusters or a connection into a VMware vCenter environment. You can read more on Groups and Clouds here and here, respectively. This guide will go through the process of adding Private Cloud-type Clouds which house HVM clusters. For VMware-type Clouds, see the associated integration guide.
Start by making your first Group. Click + CREATE at Infrastructure > Groups. A Group needs only a name, at minimum. If this Group is going to hold some or all of your HVM clusters, you may want to name it accordingly. Once done, save the new Group. We’ll next create a Cloud. Navigate to Infrastructure > Clouds and click + ADD. In addition to being a logical grouping for HVM clusters, Clouds can also be a connection into a specific VMware vCenter environment (as narrow as a specific Resource Pool or folder, or more broadly scoped). See the link in the previous paragraph for more details on VMware Clouds. In this case, create a “Private Cloud.” Once again, a name is the minimal amount of information required and you may want to name this Cloud in a way that indicates which HVM clusters it will encompass. When done, save the new Cloud.
Creating the first HVM cluster
In preparing the environment, we’ve already prepped the physical cluster servers but now it’s time to provision the actual cluster object within VM Essentials. Begin by navigating to Infrastructure > Clusters and click + ADD CLUSTER. Currently, the only available cluster type is “HVM,” which is what we want. Select the correct cluster type and click NEXT. On the Group tab, select the Group we created in the previous section and click NEXT. On the Name tab, select the Cloud we created in the previous section and enter a name for the cluster. Click NEXT.
VM Essentials gives the option to select a hyperconverged infrastructure (HCI) LAYOUT or non-HCI. In this example, the HCI Layout is used (requires a three-node minimum). Next, configure the names and IP addresses for the host boxes (SSH HOST). The SSH HOST name configuration is simply a display name in VM Essentials, it does not need to be a hostname. By default, configuration space is given for three hosts which is what this example cluster will have. You must at least configure one and it’s possible to add more by clicking the (+) button. The SSH PORT is pre-configured for port 22, change this value if applicable in your environment. Next, set a pre-existing user on the host boxes (SSH USERNAME and SSH PASSWORD) and SSH KEY. Use a regular user with sudo access.
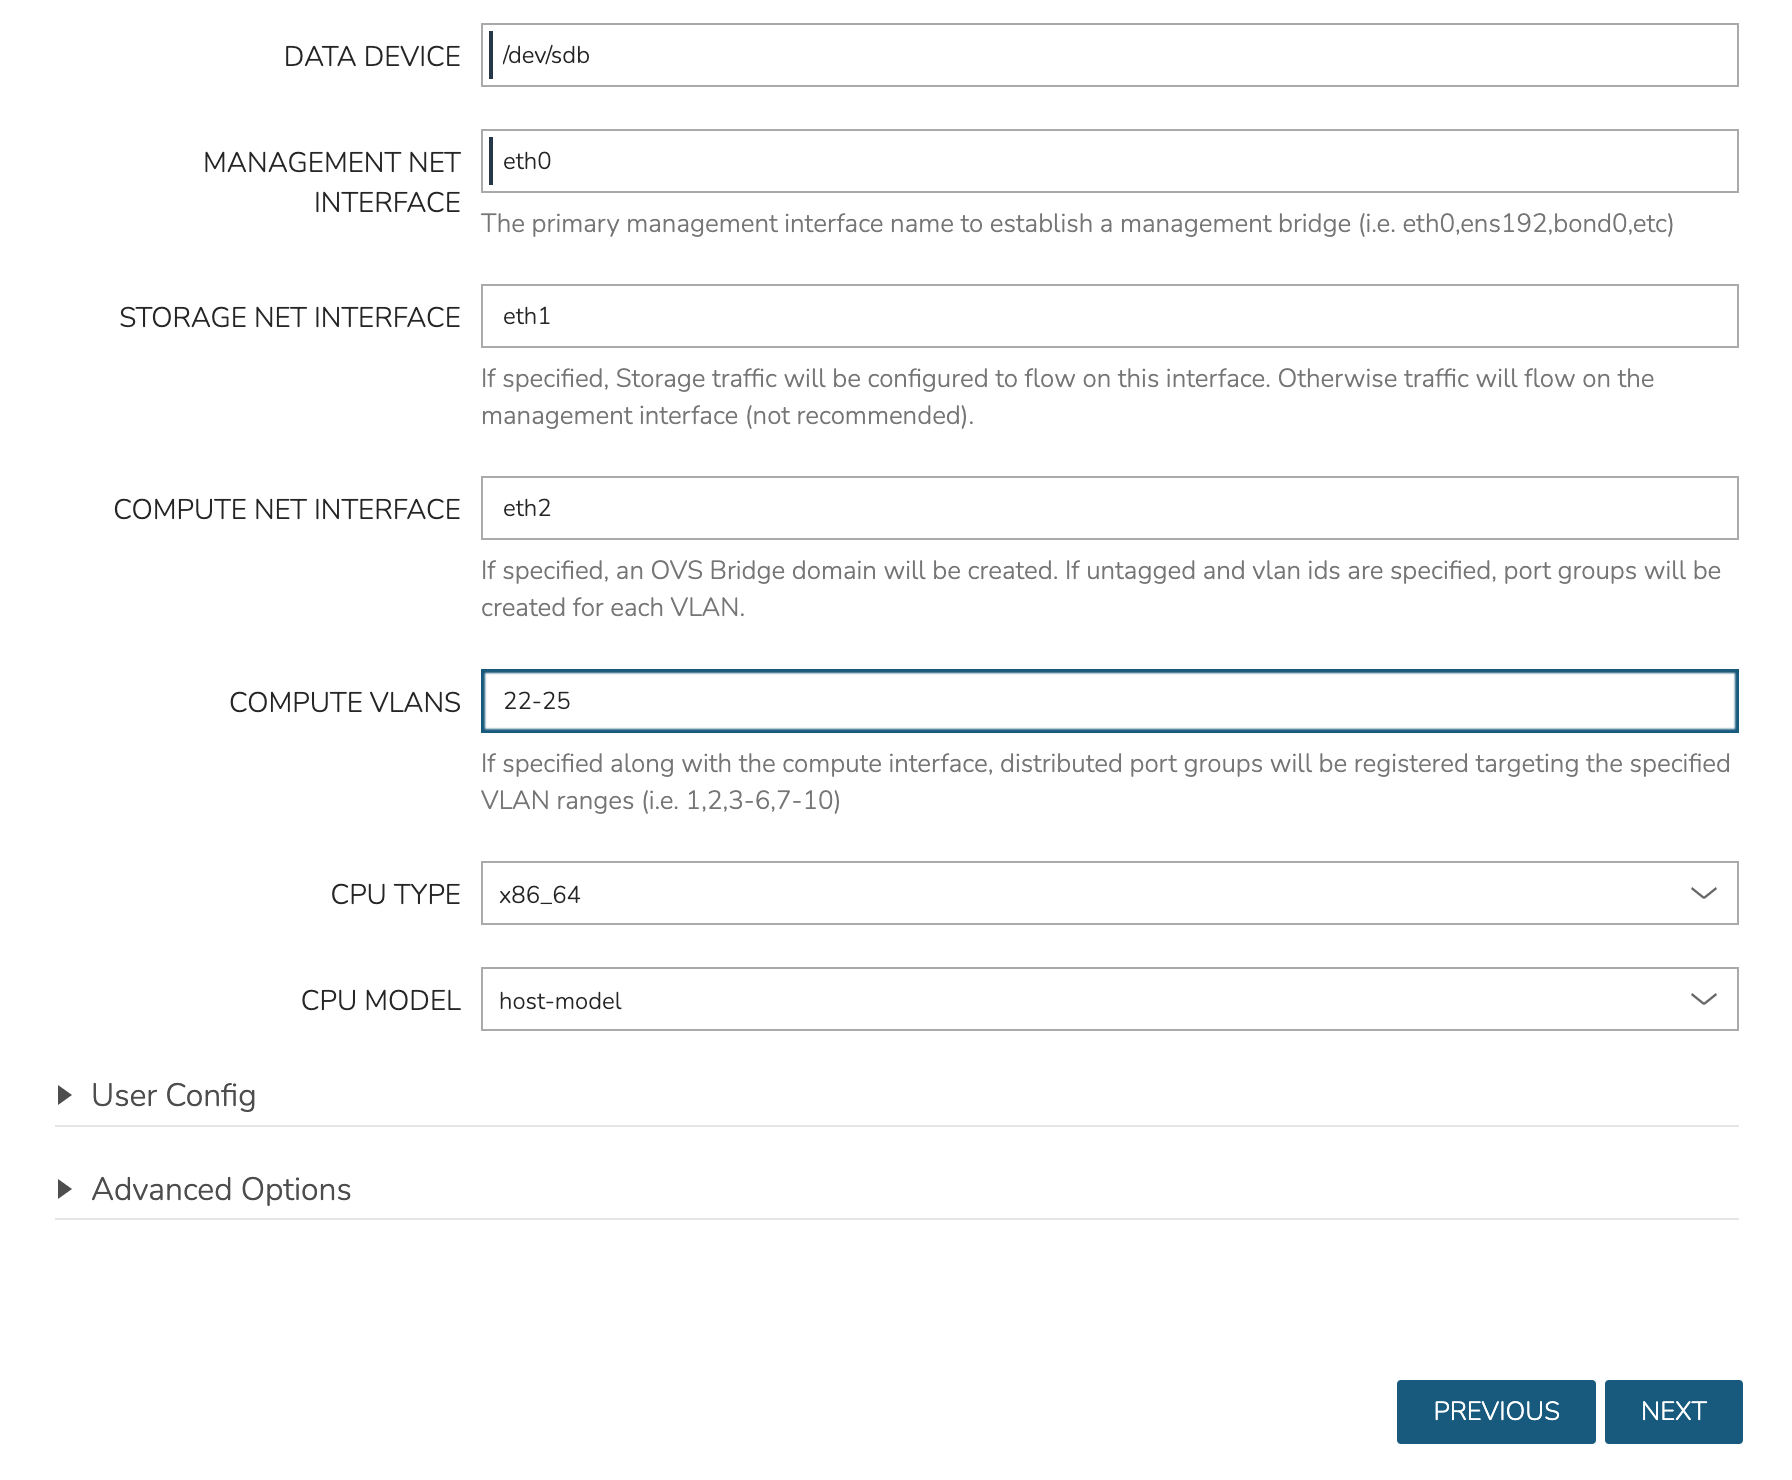
In the next part of the modal, you’ll configure the storage devices and network interfaces. When Ceph initializes, it needs to be pointed to an initial data device. Configure this in the DATA DEVICE field. At this time, only one device may be given but in the near future, an update will allow for multiple devices to be configured which would be added to the total Ceph storage as one large volume. Find your disk name, if needed, with the lsblk command. In my case, the target device is located at /dev/sdb.
Though not strictly required, it’s recommended to have separate network interfaces to handle cluster management, storage traffic, and compute. In this example case, eth0 is configured as the MANAGEMENT NET INTERFACE which handles communication between the cluster hosts. eth1 is configured as the STORAGE NET INTERFACE and eth2 is configured as the COMPUTE NET INTERFACE. The COMPUTE VLANS field can take a single value (ex. 1) or a range of values (ex. 22-25). This will create OVS port group(s) selectable as networks when provisioning workloads to the cluster. If needed, you can find your network interface names with the ip a command.
Finally, only one CPU TYPE is currently supported (x86_64) though this may change in the future. For CPU MODEL configuration, we surface the entire database of model configurations from libvirt. If unsure or if you don’t know of a specific reason to choose one or the other, select host-passthrough which is the default option.
At this point we’ve kicked off the process for configuring the cluster nodes. Drill into the Cluster detail page and click on the History tab. Here we can monitor the progress of configuring the cluster. VM Essentials will run scripts to install KVM, install Ceph, install OVS, and to prepare the cluster. In just a short time, the cluster provisioning should complete and the cluster will be ready to deploy workloads.
For more on cluster provisioning, monitoring clusters, and provisioning workloads to existing clusters, see the full section on |hvm| Clusters.
Take Note of Virtual Images and Automation
Now that we have a cluster, let’s take a quick look at where Virtual Images live and where Automation scripts can be created and stored. Both are under the Library menu. In the Virtual Images section is a list of all Virtual Images that have been synced from integrated Clouds (such as a VMware vCenter Cloud) or manually uploaded. Additionally, running workloads (such as VMs running on HVM clusters) can be saved as images with one click. Once the image has been taken, it will appear in the list of Virtual Images here. When provisioning, a list of all compatible images for the target Cloud type is shown. You will need to have at least one HVM-compatible image here in order to provision new Instances to the cluster. When uploading images manually, there’s often some additional configuration that must be done to make the image compatible with the intended target Cloud type. Take a look at Virtual Images documentation for more detail.
Next in the Library section is Automation. This page contains a list of automation scripts that are stored in VM Essentials. These scripts can be shell scripts, Powershell scripts, or a restart Task that restarts workloads it’s run against. I won’t go into full detail on writing scripts and the nuances of how they can be used in this section but there’s more in the full Tasks section of VM Essentials documentation. Tasks can be used on the Automation tab of the Instance provisioning wizard. Stack Tasks and chain the results for fully automated Instance deployment.
Provsioning the First Workload
All groundwork is now laid to begin provisioning workloads to the HVM cluster. Launch the wizard by going to Provisioning > Instances and clicking + ADD. Select an HVM-type Instance and click NEXT. You’ll once again notice the Group and Cloud we created in this guide can be selected. You’ll also specify a plan (VM size), resource pool (cluster), image, and cluster host, among a few other selections. After clicking NEXT, you’ll land on the Automation tab where a set of Tasks can be selected to automate the deployment and configuration of the new Instance. Once the wizard is fully completed, a new Instance will be provisioned to the HVM cluster. You are now ready to add more of your images, add more automation tasks, and monitor workloads that are running on your clusters.
HPE Morpheus VM Essentials Software Compatibility Matrix
This section contains the list of hardware that has been tested and confirmed to support HPE Morpheus VM Essentials Software and HVM clusters at scale. Hardware not included in this list may be compatible but is untested. Using untested hardware may limit the scope of support services available from HPE support teams.
At product launch, compatibility and scale testing has been limited to HPE hardware. As time goes on, third-party hardware will be supported in addition to HPE hardware. This document will be updated over time as new hardware SKUs are tested for compatibility and performance at scale.
Hardware Family |
Platform Type |
Hardware SKU |
Comments |
|---|---|---|---|
HPE ProLiant |
Intel 1 RU server |
HPE ProLiant DL320 Gen 12 |
|
HPE ProLiant |
Intel 1 RU server |
HPE ProLiant DL360 Gen 10+ |
|
HPE ProLiant |
Intel 1 RU server |
HPE ProLiant DL360 Gen 11 |
|
HPE ProLiant |
Intel 1 RU server |
HPE ProLiant DL360 Gen 12 |
|
HPE ProLiant |
AMD 1 RU server |
HPE ProLiant DL325 Gen 11 |
|
HPE ProLiant |
AMD 1 RU server |
HPE ProLiant DL365 Gen 11 |
|
HPE ProLiant |
AMD 2 RU server |
HPE ProLiant DL385 Gen 11 |
|
HPE ProLiant |
AMD 2 RU server |
HPE ProLiant DL345 Gen 11 |
|
HPE ProLiant |
Intel 2 RU server |
HPE ProLiant DL340 Gen 12 |
|
HPE ProLiant |
Intel 2 RU server |
HPE ProLiant DL380 Gen 10+ |
|
HPE ProLiant |
Intel 2 RU server |
HPE ProLiant DL380 Gen 11 |
|
HPE ProLiant |
Intel 2 RU server |
HPE ProLiant DL380a Gen 11 |
|
HPE ProLiant |
Intel 2 RU server |
HPE ProLiant DL380 Gen 12 |
|
HPE ProLiant |
Intel tower server |
HPE ProLiant ML350 Gen 12 |
|
HPE Synergy |
Intel single slot blade |
HPE Synergy 480 Gen 11 (Local NVMe storage, iSCSI, FC) |
|
Dell |
Dell 660 |
iSCSI, FC, NFS |
|
Dell |
Dell 670 |
iSCSI, FC, NFS |
Note
For Synergy hardware device support, review the latest SSP published for Ubuntu 22.04 on Synergy 480 Gen 11 servers here. Please note that HPE Synergy D3940 is not supported.
Hardware Family |
Platform Type |
Comments |
|---|---|---|
HPE Alletra Storage |
HPE Alletra 5000 (5010, 5030, 5050) (iSCSI) |
Update storage hardware to the latest available firmware |
HPE Alletra Storage |
HPE Alletra 6000 (6010, 6030, 6050, 6070, 6090) (iSCSI) |
Update storage hardware to the latest available firmware |
HPE Alletra Storage |
HPE Alletra 9000 (Fibre Channel) |
Update storage hardware to the latest available firmware |
HPE Alletra Storage |
HPE Alletra Storage MP B10000 (iSCSI, Fibre Channel) |
Update storage hardware to the latest available firmware |
HPE MSA Storage |
HPE MSA Gen7 (2070, 2072) (iSCSI) |
Update storage hardware to the latest available firmware |
HPE MSA Storage |
HPE MSA Gen6 (1060, 2060, 2062) (iSCSI, Fibre Channel) |
Update storage hardware to the latest available firmware |
NetApp |
NetApp AFF A400 ONTAP 9.14 |
iSCSI, FC, NFS |
NetApp |
NetApp C800 ONTAP 9.15.1P7 |
iSCSI, FC, NFS |
Dell |
Dell PowerStore 4.0.0.2 |
iSCSI, FC, NFS |
Note
For more detail, please visit the storage matrix
Partner |
Product Name |
Product Version |
Deployment |
Validation Type |
Resources |
|---|---|---|---|---|---|
Veeam |
Backup and Replication |
12.3 |
Agent-based |
Partner |
Technical Brief, Blog (part 1, part 2, part 3), Video |
Cohesity |
DataProtect |
7.1.2 and later |
Agent-based |
Partner |
|
Cohesity |
NetBackup |
11 |
Agent-based |
Partner |
|
Commvault |
Commvault Cloud Backup and Recovery |
11.40 |
Agent-based, Image-based |
Partner |
|
Oracle |
Database |
19c |
Single instance only; Oracle RAC support TBD |
HPE |
|
Microsoft |
SQL Server |
SQL Server 2016, 2017, 2019, 2022 |
Single instance with Availability Groups |
HPE |
|
MongoDB |
Enterprise Advanced |
8.0.0 |
HPE |
||
Elastic |
Elastic Stack |
9.0.0-1 |
HPE |
||
Citrix |
Citrix Virtual Apps and Desktops |
7.2402 LTSR CU1 |
HPE |
||
Omnissa |
Horizon |
8.13.1 (Build 11490723527) |
HPE |
||
HP Anyware |
HP Anyware |
25.03.1 |
HPE |
Note
Applications have been validated within the bounds of the supported VM Essentials functionality. Always check the VM Essentials feature list to determine whether specific functionality is supported by the HVM hypervisor (ex. shared disk access).
Most modern applications like databases were designed with very “loose” dependance on hardware infrastructure. They can typically run on a variety of hypervisors including virtual machines and containers. The respective ISV vendor typically only specifies the supported underlying operating system (Guest OS) but does not require certification of any hypervisor. However, there can be specific features that a customer deployment of these applications requires at a hypervisor or infrastructure level. For example, a Microsoft SQL Server Failover cluster instance requires a shared disk between multiple SQL Server VMs. Oracle, similarly, requires shared disks for an Oracle Real Application Cluster (RAC) setup. Therefore, it needs to be always validated whether the specific deployment requires certain features and whether these are supported by VM Essentials in its latest release.
Select ISV applications require “full stack” certifications including OS, hypervisor, compute and storage devices, or even the specific storage connectivity protocol. SAP HANA and related SAP applications are a typical example; so are some Healthcare Electronic Health Record (EDR) applications. If you or your customer plans on running one of these applications, please reach out to your HPE account team.
OS Vendor |
OS Family |
Compute Platform |
Storage Platform |
|---|---|---|---|
Canonical |
Ubuntu 22.04 Server, 24.04 Server |
x86 |
Alletra; iSCSI |
Partner |
Product Name |
Product Version |
Guest OS |
Validation Type |
Resources |
|---|---|---|---|---|---|
RHEL |
RHEL |
8.2, 9.0, 9.3 |
RHEL 9.3 |
HPE |
|
CentOS |
CentOS |
8 |
CentOS 8 |
HPE |
|
SUSE |
SUSE Linux Enterprise Server |
15-SP4, 15-SP6 |
SUSE 15-SP6 |
HPE |
|
Microsoft |
Windows Server |
2016, 2019, 2022, 2025 |
Windows Server 2025 |
HPE |
|
Microsoft |
Windows 11 |
24H2 |
Windows 11 24H2 |
HPE |
|
Canonical |
Ubuntu Server |
2022.04, 2024.04 |
Ubuntu Server 24.04 |
HPE |
|
Rocky Enterprise Software Foundation (RESF) |
Rocky Linux |
9.5 |
Rocky Linux 9.5 |
HPE |
Additional Resources
Service Pack ProLiant Index Page: Gen12 SPP, Gen11 SPP, Gen10+/Gen10 SPP
Upgrading to Morpheus
This section of the guide goes over the process for upgrading a HPE Morpheus VM Essentials Software appliance to a full Morpheus appliance. HPE Morpheus VM Essentials Software and Morpheus are essentially the same product with VM Essentials focused specifically on management and consumption of HVM clusters and Morpheus adding on support for many other public and private Cloud types with a richer orchestration and automation experience (in addition to all features included with VM Essentials). Morpheus requires separate licensing, reach out to your account manager if you’re unsure which licensing entitlements you can access. This guide is intended for VM Essentials administrators to upgrade their existing appliances to Morpheus and assumes a level of comfort with the Linux command line and the version upgrade process for VM Essentials and/or Morpheus. After upgrading, refer to Morpheus documentation for use guides to consuming the full Morpheus feature set.
Prerequisites
VM Essentials manager version 8.0.1+
A bucket integrated with VM Essentials manager which can house an appliance database backup
The Morpheus upgrade package (version 8.0.4+)
A Morpheus license to add following the upgrade to enable the full feature set
Back Up the Appliance
Start by taking a fresh backup of the appliance database. View the appliance backup job by navigating to Backups > Jobs. As in the screenshot, there should be a backup job named “Morpheus Appliance.” If an appliance backup job is not shown, enable the “Backup Appliance” setting within global settings (Administration > Settings > Backups).
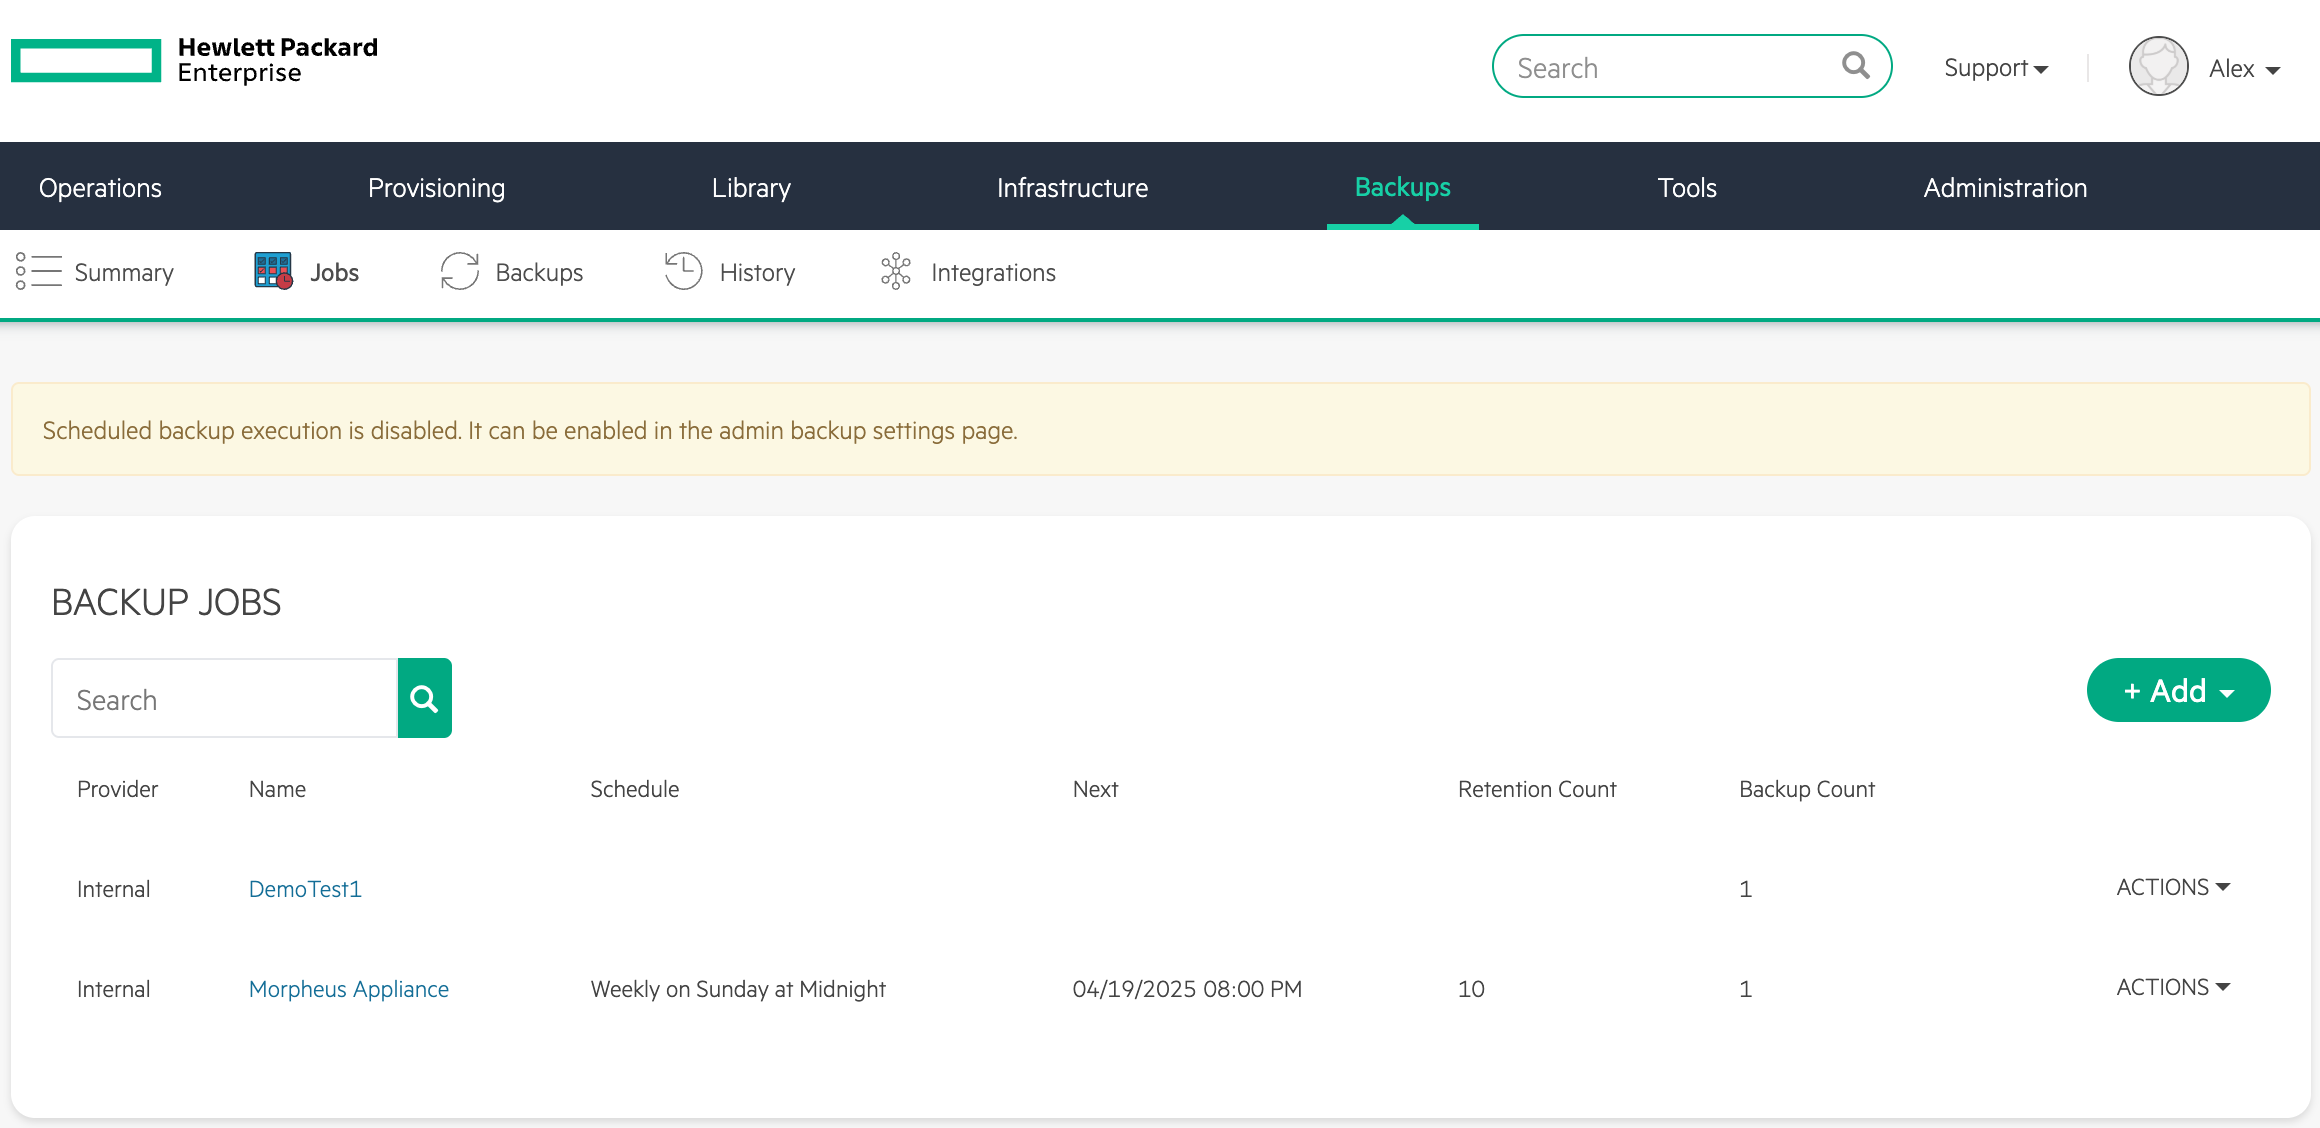
Click Run Now and wait for a new green checkmark to appear indicating a new run of the backup job was successful.
Package Installation
Upgrading the VM Essentials manager to a full Morpheus appliance is as simple as installing the Morpheus package over the existing VM Essentials package in a process very similar to version upgrades you may have done in the past. First, download the Morpheus .deb package. The download URL shown below is a placeholder, reach out to your account manager if you’re unsure where to find the download URL for the latest Morpheus package.
wget https://url.to.morpheus-appliance_x.x.x-x.deb
Next, stop the Morpheus UI.
sudo morpheus-ctl stop morpheus-ui
Install the Morpheus package and force it to overwrite.
dpkg -i --force-overwrite morpheus-appliance_x.x.x-x.deb
Wait for the installation to complete. There will be warnings about conflicts which may be safely ignored. When installation is complete, you will see a message similar to the screenshot below:

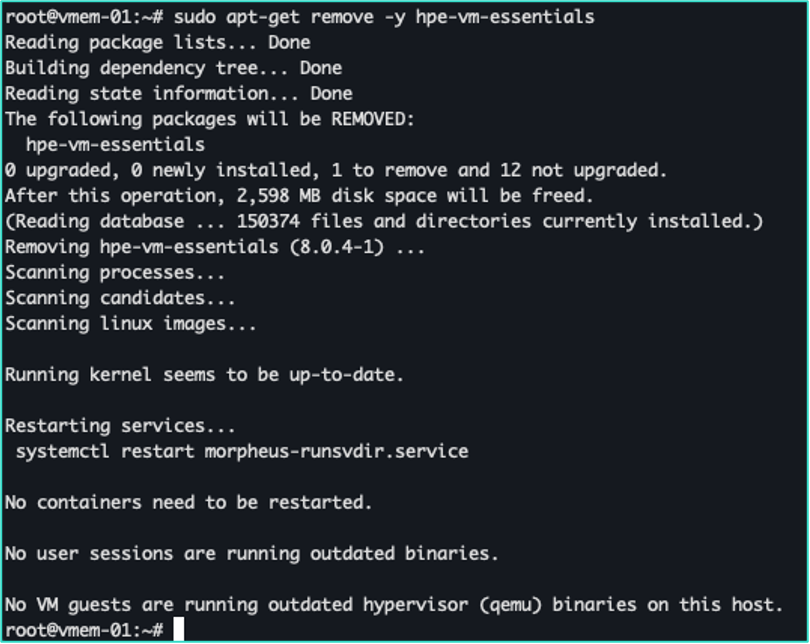
Now, remove the VM Essentials package.
sudo apt-get remove -y hpe-vm-essentials
Following removal, restart any recommended services if prompted.
We must now clean up OpenSearch directories. Currently, Morpheus uses ElasticSearch while VM Essentials manager uses OpenSearch. Migration through snapshots is not supported due to this incompatibility. In general, OpenSearch and ElasticSearch contain VM performance metrics. This data can be considered ephemeral and safely deleted as the default retention is only 30 days. Morpheus is planned to migrate to OpenSearch in the future and at that point, this cleanup step will not be required and metrics will persist across an upgrade to Morpheus. Remove the following directories:
rm -rf /var/run/morpheus/opensearch
rm -rf /opt/morpheus/service/opensearch
Next, run the reconfigure command. This will configure ElasticSearch for use with the upgraded appliance.
sudo morpheus-ctl reconfigure
Once the reconfigure is complete, make sure all Morpheus services are started
sudo morpheus-ctl status
If any services need started, use the following command:
sudo morpheus-ctl start {service name}
You can watch the logs to see when the UI comes back up:
sudo morpheus-ctl tail morpheus-ui
When the Morpheus ASCII logo appears, you should be able to reach the UI from a web browser.
Upgrading the License
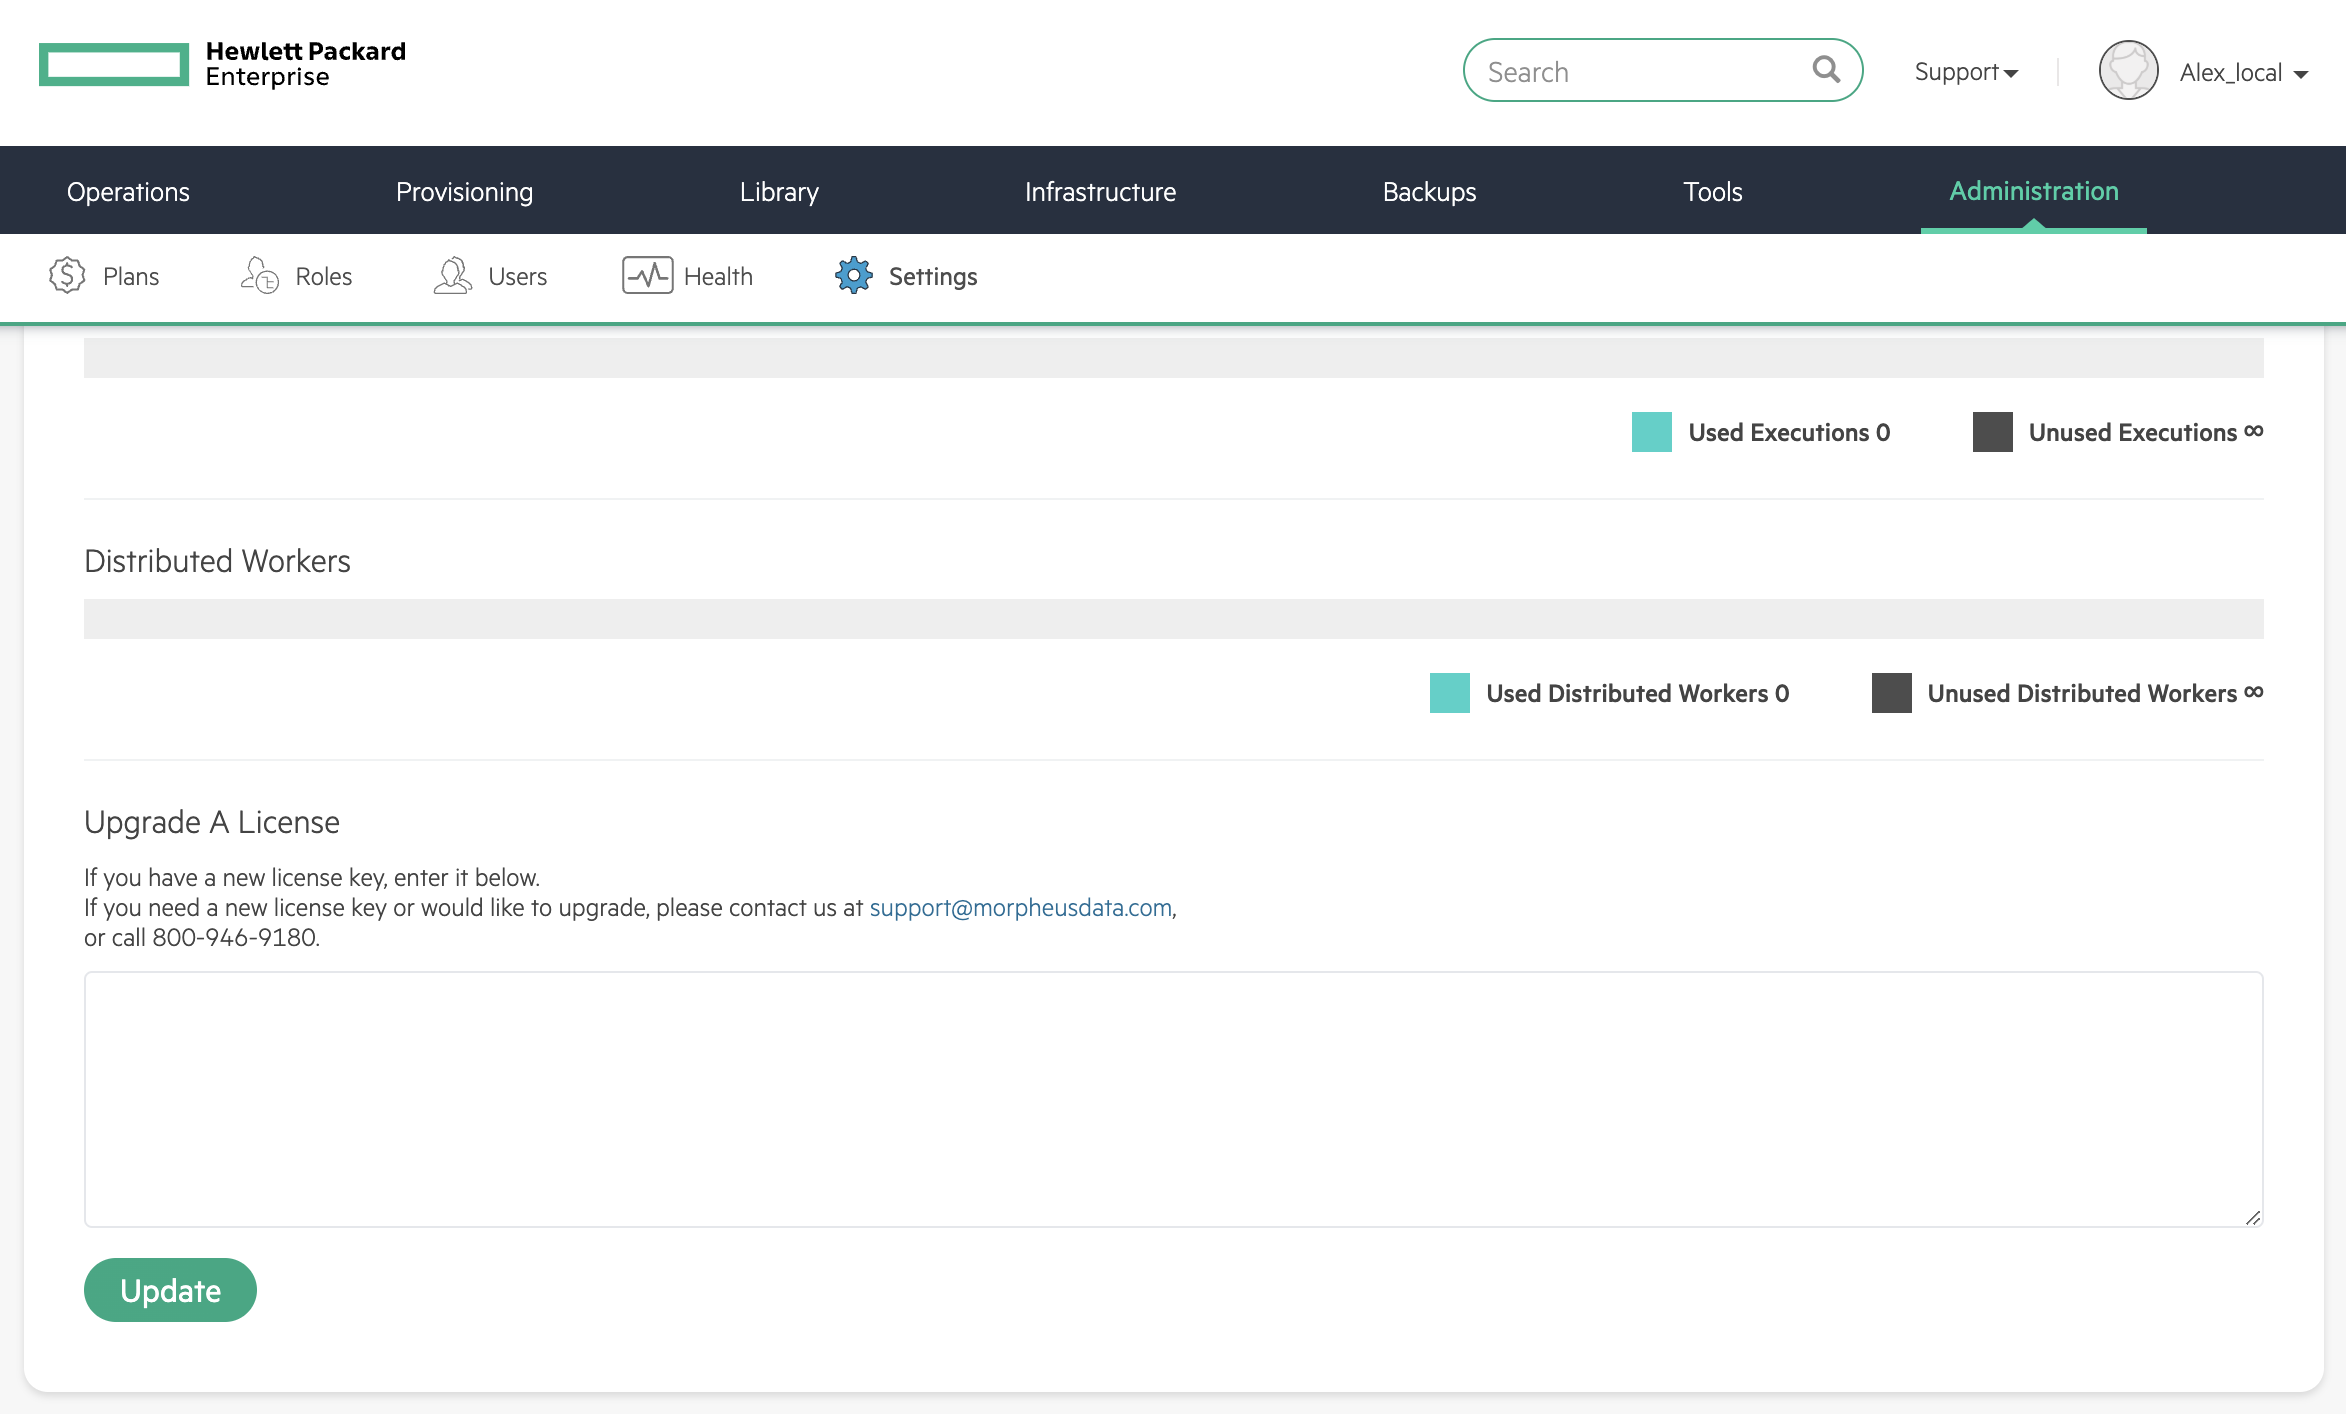
Now that Morpheus UI is reachable, the license must be upgraded. Navigate to Administration > Settings > License where you’ll see a field to paste in your license key. Once again, contact your account manager if you have questions on accessing your license key. Finally, make sure you select the appropriate option of either stacking the license onto an existing license or replacing it. Then, click Update.
At this point, the process is complete. Now that the full Morpheus feature set is unlocked, refer to Morpheus documentation going forward.